SharePoint Provisioning Automation for Business Requests
User request → manager approval → Logic App orchestration → PnP PowerShell runbook → error logging → instant email notification. The complete pipeline.
User request → manager approval → Logic App orchestration → PnP PowerShell runbook → error logging → instant email notification. The complete pipeline.
Every SharePoint admin knows the pain: someone requests a new site, a ticket is raised, IT gets to it three days later, the site is created manually without a standard structure, and the requester gets a URL in a chat message. This guide replaces that entire process with SharePoint provisioning automation for business requests: a self-service pipeline that provisions a properly structured site in under five minutes with manager approval, audit logging, error recovery, and email notifications built in from the start.
The pipeline is made up of six components working in sequence. Each has a single, clear responsibility, which makes the whole system easy to maintain and easy to debug when something goes wrong.
A SharePoint list form (or embedded Power Apps canvas app) captures site name, URL alias, type, template, owner, and business purpose. The item is created with Status = Pending Approval.
A cloud flow detects the new item, looks up the requester's line manager from Microsoft Entra ID, and sends an Adaptive Card approval to the manager's Teams and email. A 48-hour timeout triggers a reminder and notifies the requester.
On approval, Power Automate POSTs the request to a Logic App HTTP trigger. The Logic App validates the URL, calls an Azure Automation runbook, polls for completion, and handles all success and failure branches.
The runbook connects via Managed Identity, creates the site, adds owners, applies the correct template structure (document libraries, lists, folders), and sets the sharing policy. It returns the provisioned URL or throws a descriptive error.
If any step fails, the Logic App catch scope writes a structured entry to a Site Provision Logs list — including which step failed, the error message, and the Azure Automation job ID for deep-dive tracing.
Success delivers the site URL and quick-start tips. Rejection delivers the manager's reason. Failure delivers a reference ID and a support link — no one is left waiting and wondering.
The five services below form a linear chain for the happy path. On rejection or error, the flow branches left to send the requester an email and log the outcome.
| Component | Service | Role in the pipeline |
|---|---|---|
| Site Requests list | SharePoint | Input form, status tracking, approved URL storage |
| Site Provision Logs list | SharePoint | Structured error and audit log — the single pane of glass for all failures |
| Approval flow | Power Automate | Manager lookup, Adaptive Card approval, rejection email |
| Provisioning orchestrator | Logic App | URL check, runbook invocation, polling, error catch, success/failure routing |
| SP-SiteProvisioning runbook | Azure Automation | PnP PowerShell — creates site, applies template, sets permissions |
| Managed Identity | Azure Automation | Passwordless, auditable authentication to SharePoint |
This pipeline spans five Microsoft services. Set up all permissions and licences below before building any step — a missing permission causes silent failures that are painful to debug mid-build.
Set-PnPTenantSiteEstimated monthly Azure cost at 50 site requests/month: Azure Automation — first 500 job-minutes/month free, then ~$0.002/minute (~3 min per run = ~$0.006 per request beyond the free tier). Logic App Consumption — ~30 actions per run, first 4,000 free then $0.000025/action. Total Azure cost for 50 requests: typically under $2/month. Power Automate premium connector licence is the main cost driver ($15/user/month for Per User plan).
Two SharePoint lists underpin the entire pipeline. Create them in a central IT or admin site collection — not in a personal or team site. You need Site Collection Administrator rights to create lists and columns.
This is the intake form and the live status board. Every provisioning request flows through it from submission to completion.
| Column name | Type | Notes |
|---|---|---|
| Title | Single line | Site display name — shown in navigation and SharePoint home |
| SiteURLAlias | Single line | The URL slug (e.g. marketing-2026). Validate: lowercase, letters/numbers/hyphens only, max 40 chars |
| SiteType | Choice | Communication Site · Team Site — SharePoint Only · Team Site with M365 Group |
| Template | Choice | General, Project Team, HR Department, IT Service Desk |
| BusinessPurpose | Multiple lines | Required — shown in the manager approval card |
| PrimaryOwner | Person or Group | Gets Site Collection Admin rights |
| SecondaryOwner | Person or Group | Optional — also gets Site Collection Admin rights |
| Status | Choice | Pending Approval · Approved · Rejected · Provisioning · Provisioned · Failed |
| ManagerNotes | Multiple lines | Approval or rejection comment written back by the flow |
| ProvisionedURL | Single line | Full site URL written back on success — use as a hyperlink column |
| LogicAppRunID | Single line | Logic App run ID for tracing in Azure Portal |
Tip: Add a calculated column SiteFullURL with formula ="https://yourtenant.sharepoint.com/sites/"&SiteURLAlias to give approvers a preview of the exact URL before they approve.
The SiteType choice has significant implications — it determines whether an M365 Group (Exchange mailbox, Planner, Teams) is created alongside the SharePoint site. Make this decision clear in the request form so users know what they're asking for.
| Choice in form | Runbook value | M365 Group | Teams team | Best for |
|---|---|---|---|---|
| Communication Site | CommunicationSite |
No | No | Intranet portals, news hubs, HR/IT/policy sites — content published to a broad audience. No Members group; visitors read, owners publish. |
| Team Site — SharePoint Only | TeamSiteWithoutMicrosoft365Group |
No | No | Project or department collaboration without needing an M365 Group. Gets Owners/Members/Visitors groups. No Exchange mailbox, no Planner, no auto-Teams. |
| Team Site with M365 Group | TeamSite |
Yes — Exchange mailbox, Planner, Group email | Optional (created separately or by user) | Full M365 Group workspace. The SharePoint site, Group inbox, Planner, and (if needed) Teams team are all linked. Use when the team needs more than just file storage. |
Group-connected sites consume an M365 Group licence slot and create an Exchange Group mailbox. Each tenant has a default limit of 500,000 Groups (practically unlimited) but each Group also gets 50 GB mailbox storage included in E3/E5. For large organisations, governance of Group-connected sites is more complex — make sure your requester understands this before selecting "Team Site with M365 Group".
Parameter differences verified against PnP docs:
CommunicationSite: uses -Url (full URL), -Owner, -SiteDesign. Does not accept -Description — apply via Set-PnPWeb after creation.
TeamSiteWithoutMicrosoft365Group: uses -Url, -Owner. Does not accept -Description or -SiteDesign.
TeamSite (group-connected): uses -Alias (not -Url), -Owner, and does accept -Description (sets both Group and site description). The alias must be unique across all M365 Groups in the tenant.
When the Logic App's error handler fires, it writes a row here. This gives IT admins a searchable, filterable audit trail without needing to dig through Azure Portal logs.
| Column name | Type | Notes |
|---|---|---|
| Title | Single line | Auto-set: ERR-[RequestID]-[Timestamp] — makes each row uniquely identifiable |
| RequestID | Number | ID of the row in Site Requests list |
| SiteURL | Single line | The attempted site URL alias |
| LogLevel | Choice | Info · Warning · Error |
| FailedStep | Single line | Which Logic App action or runbook step failed (e.g. New-PnPSite, URL check) |
| ErrorMessage | Multiple lines | Human-readable description from the Logic App error object |
| RawError | Multiple lines | Full stack trace or raw exception — for deep debugging |
| RunbookJobID | Single line | Azure Automation job GUID — use in Portal to see full runbook output |
| RetryCount | Number | How many times the Logic App has retried this operation |
Create a new Automated cloud flow in Power Automate named SP Site Request — Manager Approval. This flow runs entirely within your Microsoft 365 tenant — no Azure subscription required.
Trigger: When an item is created (SharePoint connector) — pointing to the Site Requests list.
Immediately after the trigger, add a Condition that checks Status Value equals Pending Approval. This guards against re-triggering if an item is modified after the flow runs.
Validate the alias before it reaches the manager. If it fails, the manager never sees an approvable request that would fail at the runbook stage anyway. Add a Condition action with three checks combined using and():
In the Condition action, add three rows using And. Copy each expression into the left-hand value field and set the right-hand comparison to is equal to true:
# Row 1: Length 2–40 characters
@{and(greaterOrEquals(length(triggerOutputs()?['body/SiteURLAlias']), 2),
      lessOrEquals(length(triggerOutputs()?['body/SiteURLAlias']), 40))}

# Row 2: All lowercase — no uppercase characters allowed
@{equals(toLower(triggerOutputs()?['body/SiteURLAlias']),
          triggerOutputs()?['body/SiteURLAlias'])}

# Row 3: No spaces (catches multi-word aliases)
@{not(contains(triggerOutputs()?['body/SiteURLAlias'], ' '))}

# If condition = false → Update Status to "Failed" → Send email "URL alias is invalid" → Terminate
Why not full regex in Power Automate? Power Automate does not have a native regex match() function in standard expressions. The three checks above cover the most common mistakes (spaces, uppercase, too long). For stricter validation — including no leading/trailing hyphens and reserved words — add a separate Filter array action against a SharePoint list of reserved prefixes, or move the regex check into a small Azure Function called from the flow.
Add a Get manager (V2) action from the Office 365 Users connector. Pass the requester's email from the trigger. This resolves the correct approver automatically — the flow never needs a hardcoded email.
Add a Start and wait for an approval action from the Approvals connector. Configure it as follows:
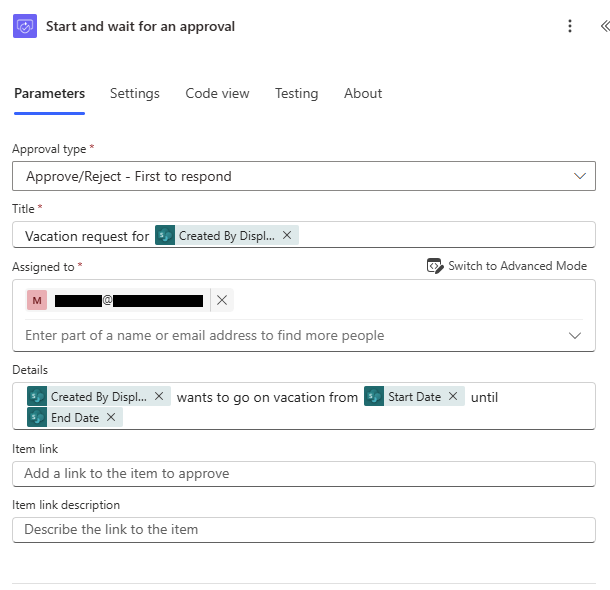
Approval type:  Approve/Reject - First to respond

Title:          Site request: @{triggerOutputs()?['body/Title']}

Assigned to:    @{outputs('Get_manager_(V2)')?['body/mail']}
                # This is the manager's email from the Get manager (V2) action

Details:        Requester: @{triggerOutputs()?['body/Author/DisplayName']}
                URL alias: @{triggerOutputs()?['body/SiteURLAlias']}
                Type: @{triggerOutputs()?['body/SiteType/Value']}
                Purpose: @{triggerOutputs()?['body/BusinessPurpose']}

Item link:      @{triggerOutputs()?['body/{Link}']}
                # Opens the SharePoint list item so the approver can review the full request

Timeout:        P2D
                # ISO 8601 for 48 hours — after this, approval action status = TimedOut
# Handle the timed-out branch via Configure run after → Has timed outIn the Yes branch of a Condition on Outcome equals Approve:
In the No branch:
Rejection email template
Subject: Your SharePoint site request was not approved
Hi [Requester first name],
Your request for a SharePoint site named "[Site Title]" was reviewed by [Manager name] and was not approved at this time.
Reason: [ManagerNotes]
If you'd like to resubmit with amendments, click the link to the Site Requests list in your confirmation email. If you have questions, reply to this email.
Use Configure run after on a parallel branch set to run when the approval action has timed out. In this branch: send a reminder email to the manager and a holding email to the requester ("We've chased your manager and are waiting for a response").
The Logic App is the heart of the pipeline. It owns every step after approval: URL validation, runbook invocation, polling, error capture, and all notifications. Create a Consumption plan Logic App — this keeps costs near zero since provisioning requests are infrequent.
Add a When a HTTP request is received trigger. Use Use sample payload to generate schema and paste a representative JSON body to get the schema auto-generated. Copy the generated URL and paste it into the Power Automate HTTP action from Step 2.
{
  "requestItemId": 42,
  "siteTitle": "Marketing Hub 2026",
  "siteUrlAlias": "marketing-hub-2026",

  // siteType — THREE valid values only:
  // "CommunicationSite"                  → publishing/intranet site, no group
  // "TeamSiteWithoutMicrosoft365Group"   → collaboration site, no group, no Teams
  // "TeamSite"                           → group-connected, creates M365 Group + optional Teams
  "siteType": "CommunicationSite",

  // template — controls document structure applied by the runbook
  // "General" | "Project Team" | "HR Department" | "IT Service Desk"
  "template": "General",

  "primaryOwnerEmail": "[email protected]",
  "secondaryOwnerEmail": "[email protected]",  // optional, empty string if not set
  "description": "Central hub for the Marketing department",
  "requesterEmail": "[email protected]",
  "tenantName": "contoso"   // subdomain only — "contoso" not "contoso.sharepoint.com"
}After the Parse JSON action, add a Condition that validates all required fields before any SharePoint or Azure Automation actions run. One bad field at this stage is far cheaper to catch than a runbook failure 5 minutes later.
@{not(empty(body('Parse_JSON')?['siteTitle']))}@{and(not(empty(body('Parse_JSON')?['siteUrlAlias'])), lessOrEquals(length(body('Parse_JSON')?['siteUrlAlias']), 40))}@{contains(createArray('CommunicationSite','TeamSiteWithoutMicrosoft365Group','TeamSite'), body('Parse_JSON')?['siteType'])}@{contains(createArray('General','Project Team','HR Department','IT Service Desk'), body('Parse_JSON')?['template'])}@{contains(body('Parse_JSON')?['primaryOwnerEmail'], '@')}The siteType validation is critical. If an unexpected value reaches the runbook, [ValidateSet] on the $SiteType parameter will throw a ParameterBindingValidationException immediately. The Logic App validation catches this before a job is even created, saving the polling wait time and providing a cleaner error message to the requester.
Before invoking the runbook, verify the URL alias is not already taken. Use the Microsoft Graph API — it returns a clean 404 for non-existent sites and 200 for existing ones, making the check unambiguous.
Why not the SharePoint REST API? GetSitePropertiesByUrl returns HTTP 200 for both existing and non-existing sites — it embeds an error message in the JSON body rather than using HTTP status codes. This makes it unreliable as a branch condition. The Graph API is the correct tool here.
# Graph endpoint — reliable 200/404 for site existence check
# 200 = site exists (URL taken)   |   404 = URL is free to use
GET https://graph.microsoft.com/v1.0/sites/
    @{body('Parse_JSON')?['tenantName']}.sharepoint.com:
    /sites/@{body('Parse_JSON')?['siteUrlAlias']}:

Method:         GET
Authentication: Managed Identity
Audience:       https://graph.microsoft.com

# The Logic App Managed Identity needs "Sites.Read.All" on Graph
# (granted via Entra → Enterprise applications → your Logic App MI → API permissions)
Follow with a Condition: if outputs('Check_URL')?['statusCode'] equals 200 → site exists. Route to an error log entry, update Status to Failed, email the requester with a "URL already taken" message, then Terminate. The 404 branch continues to provisioning.
Grant the Graph permission: In the Azure Portal, go to your Logic App → Identity → System assigned → Azure role assignments does NOT cover Graph. Instead go to Entra ID → Enterprise applications → search your Logic App's display name → Permissions → Grant admin consent for Sites.Read.All. Alternatively, use a PowerShell one-liner: New-MgServicePrincipalAppRoleAssignment.
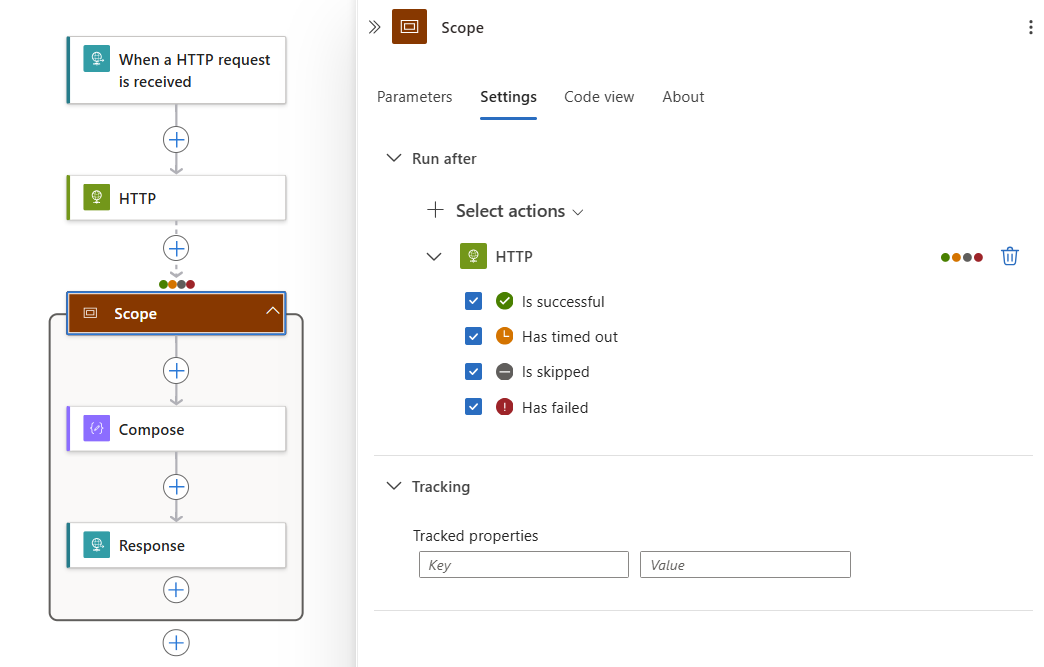
Wrap all remaining steps inside a Scope action named Try. Then add a second Scope named Catch configured via Configure run after to run only when Try has failed. This is the Logic App equivalent of try/catch and ensures no error path is left unhandled.
# TOP LEVEL (before the Try scope — Initialize variable MUST be here)
Initialize variable — name: runbookJobId   type: String   value: ""
Initialize variable — name: requestItemId  type: Integer  value: @{body('Parse_JSON')?['requestItemId']}

# SCOPE: Try
  SharePoint — Update item (SiteRequestsListId, Id=requestItemId, Status="Provisioning")
  Azure Automation — Create job (runbook: SP-SiteProvisioning, all site params as key/value)
  Set variable — runbookJobId = @{body('Create_job')?['properties/jobId']}
  SharePoint — Update item (LogicAppRunID = @{variables('runbookJobId')})
  Do Until (exit when job status is Completed/Failed/Suspended, or counter > 20)
    Delay — 30 seconds
    Azure Automation — Get job (@{variables('runbookJobId')})
  Condition — @{equals(body('Get_job')?['properties/status'], 'Completed')}
    TRUE branch:
      Azure Automation — Get job output
      SharePoint — Update item (Status="Provisioned", ProvisionedURL=extracted URL)
      Office 365 Outlook — Send an email (V2) — success notification
    FALSE branch:
      Terminate (Status=Failed, message="Runbook did not complete successfully")
      # Terminate with Failed causes the Try scope to fail → triggers Catch scope

# SCOPE: Catch   (Configure run after: Try scope → Has failed)
  SharePoint — Create item in Site Provision Logs (using result('Try') expressions)
  SharePoint — Update item (Status = "Failed")
  Office 365 Outlook — Send an email (V2) — failure notification
Initialize variable must be before the Try scope. Logic Apps does not allow Initialize variable inside a Scope action — it throws a designer validation error. Declare both variables at the top level before the Try scope. Inside the scope, use Set variable (not Initialize variable) to assign values.
Inside the Try scope:
runbookJobId = @{body('Create_job')?['properties/jobId']}@{contains(createArray('Completed','Failed','Suspended'),
body('Get_job')?['properties/status'])}@{trim(last(split(body('Get_job_output')?['value'], 'PROVISIONED:')))} → update item (Status=Provisioned, ProvisionedURL) → send success emailInside the Catch scope (Configure run after → Try has failed):
result('Try') to extract the failed action name and error detailMake the Power Automate → Logic App HTTP call asynchronous. By default, Power Automate's HTTP action waits synchronously for the Logic App to finish — which means the approval flow hangs for the full provisioning duration (up to 10 minutes). In the HTTP action settings, enable Asynchronous Pattern. This lets Power Automate fire the Logic App and move on immediately; the Logic App sends all notifications independently.
# result('Try') returns an array of all actions in the Try scope.
# Filter to the first failed action to get the most relevant error.
# Use these expressions in the "Create item in Provision Logs" action:

# Title — unique identifier for the log row
ERR-@{variables('requestItemId')}-@{formatDateTime(utcNow(),'yyyyMMdd-HHmmss')}

# Name of the Logic App action that failed
@{first(filter(result('Try'), item()?['status'] == 'Failed'))?['name']}

# Human-readable error message from the failed action
@{first(filter(result('Try'), item()?['status'] == 'Failed'))?['error']?['message']}

# Full error code (e.g. ActionFailed, BadRequest)
@{first(filter(result('Try'), item()?['status'] == 'Failed'))?['error']?['code']}

# Azure Automation job ID stored earlier in the Try scope
@{variables('runbookJobId')}

# Extract provisioned URL from job output (in the Completed branch):
# job output format: "PROVISIONED:https://contoso.sharepoint.com/sites/marketing-hub-2026"
@{replace(body('Get_job_output')?['value'], 'PROVISIONED:', '')}The runbook is a PowerShell 7.4 runbook in an Azure Automation account. It does all the actual SharePoint work: creates the site, adds owners, applies the template structure, and locks down sharing settings.
Never store credentials in a runbook. Use Managed Identity exclusively. If your Automation account cannot use Managed Identity (very old accounts), use a Certificate credential stored in Azure Key Vault and fetched at runtime via Get-AutomationCertificate — never a plaintext password.
The critical design decision in this runbook is maintaining two named PnP connections — one to the SharePoint admin centre and one to the new site. Set-PnPTenantSite calls the Tenant Admin REST API and must go through the admin connection. If you call it while connected to the regular site, it silently fails or throws a 403.
param(
    # TenantName: the subdomain portion only — e.g. "contoso" not "contoso.sharepoint.com"
    [Parameter(Mandatory=$true)] [string]$TenantName,

    # SiteTitle: the display name shown in the browser tab and SharePoint navigation
    [Parameter(Mandatory=$true)] [string]$SiteTitle,

    # SiteUrlAlias: the path segment after /sites/ — must be lowercase letters, numbers,
    # and hyphens only; max 40 characters; validated in Power Automate before approval
    [Parameter(Mandatory=$true)] [string]$SiteUrlAlias,

    # SiteType: determines which New-PnPSite type is used and whether an M365 Group is created.
    # Exactly three valid values — enforced here AND validated in the Logic App before this runs:
    #   CommunicationSite                → publishing site, no group, -Url and -Owner params
    #   TeamSiteWithoutMicrosoft365Group → collaboration site, no group, -Url and -Owner params
    #   TeamSite                         → group-connected, -Alias param (NOT -Url), creates M365 Group
    [Parameter(Mandatory=$true)]
    [ValidateSet("CommunicationSite","TeamSiteWithoutMicrosoft365Group","TeamSite")]
    [string]$SiteType,

    # Template: controls which lists, libraries, and folders are provisioned
    [Parameter(Mandatory=$true)]
    [ValidateSet("General","Project Team","HR Department","IT Service Desk")]
    [string]$Template,

    # PrimaryOwnerEmail: UPN of the person who owns the site — gets Site Collection Admin rights
    [Parameter(Mandatory=$true)] [string]$PrimaryOwnerEmail,

    # SecondaryOwnerEmail: optional second site collection admin (can be left empty)
    [string]$SecondaryOwnerEmail = "",

    # Description: shown on the SharePoint site card in the home page and search results
    [string]$Description = "",

    # RequestItemId: ID of the originating row in the Site Requests list —
    # included in all log output so errors can be traced back to the request
    [Parameter(Mandatory=$true)] [string]$RequestItemId
)

# Convert all non-terminating errors to terminating so the catch block always fires.
# Without this, some PnP cmdlet failures only write to the error stream and continue.
$ErrorActionPreference = 'Stop'

# Build both URLs up front — used multiple times and must be consistent
$adminUrl    = "https://$TenantName-admin.sharepoint.com"
$siteFullUrl = "https://$TenantName.sharepoint.com/sites/$SiteUrlAlias"

Write-Output "INFO: RequestID=$RequestItemId | Provisioning started | Target: $siteFullUrl"

try {
    # ── Establish two named connections ──────────────────────────────────────
    #
    # WHY TWO CONNECTIONS?
    #   - Set-PnPTenantSite calls the Tenant Admin REST API at *-admin.sharepoint.com
    #     It MUST be called using the admin connection, not the site connection.
    #     Calling it on a site connection silently fails or returns 403.
    #   - Add-PnPSiteCollectionAdmin, New-PnPList, Add-PnPFolder all operate on
    #     the site itself and must use the site connection.
    #
    # -ReturnConnection stores the connection object in a variable.
    # Passing -Connection to each cmdlet explicitly controls which endpoint is called.

    $adminConn = Connect-PnPOnline -Url $adminUrl -ManagedIdentity -ReturnConnection
    Write-Output "INFO: Admin connection established ($adminUrl)"

    # ── Create the site ───────────────────────────────────────────────────────
    #
    # -Wait blocks until the site is fully provisioned and responsive.
    # Without it, Connect-PnPOnline to the new site fails with 404.
    #
    # VERIFIED PARAMETER SETS (PnP PowerShell 2.x docs — common source of bugs):
    #
    #   CommunicationSite:
    #     Valid: -Url (full URL), -Owner (UPN), -SiteDesign (Blank|Topic|Showcase)
    #     NO -Description — passing it throws ParameterBindingException.
    #     Description applied after creation via Set-PnPWeb (see below).
    #
    #   TeamSiteWithoutMicrosoft365Group:
    #     Valid: -Url (full URL), -Owner (UPN)
    #     NO -Description, NO -SiteDesign — both throw ParameterBindingException.
    #     No M365 Group. Gets Owners/Members/Visitors SharePoint groups.
    #
    #   TeamSite (group-connected):
    #     Valid: -Alias (alias only — NOT -Url), -Owner (UPN), -Description
    #     -Description IS supported here (sets both Group and site description).
    #     Passing -Url for this type throws ParameterBindingException.
    #     SharePoint auto-constructs URL as /sites/{Alias}.
    #     Creates M365 Group: Exchange mailbox, Planner, Group email address.
    #     -Alias must be unique across ALL M365 Groups, not just SharePoint.

    if ($SiteType -eq "CommunicationSite") {
        # -Description is NOT in the CommunicationSite parameter set.
        # It is applied via Set-PnPWeb after connecting (see below).
        New-PnPSite -Type CommunicationSite `
            -Title      $SiteTitle `
            -Url        $siteFullUrl `
            -Owner      $PrimaryOwnerEmail `
            -SiteDesign Blank `
            -Wait `
            -Connection $adminConn

    } elseif ($SiteType -eq "TeamSiteWithoutMicrosoft365Group") {
        # Neither -Description nor -SiteDesign exist in this parameter set.
        # Description applied via Set-PnPWeb after connecting (see below).
        New-PnPSite -Type TeamSiteWithoutMicrosoft365Group `
            -Title      $SiteTitle `
            -Url        $siteFullUrl `
            -Owner      $PrimaryOwnerEmail `
            -Wait `
            -Connection $adminConn

    } else {
        # TeamSite (group-connected): -Alias NOT -Url; -Description IS supported here.
        # URL auto-created as: https://{TenantName}.sharepoint.com/sites/{SiteUrlAlias}
        # Also creates M365 Group (Exchange mailbox, Planner, Group email address).
        New-PnPSite -Type TeamSite `
            -Title       $SiteTitle `
            -Alias       $SiteUrlAlias `
            -Owner       $PrimaryOwnerEmail `
            -Description $Description `
            -Wait `
            -Connection  $adminConn
    }
    Write-Output "INFO: Site created at $siteFullUrl"

    # Connect to the new site for all subsequent site-level operations
    $siteConn = Connect-PnPOnline -Url $siteFullUrl -ManagedIdentity -ReturnConnection
    Write-Output "INFO: Site connection established ($siteFullUrl)"

    # Apply description for the two types that do not accept it during New-PnPSite.
    # Set-PnPWeb (not Set-PnPSite) is the correct cmdlet — it sets the web-level
    # Description property. Set-PnPSite does not have a -Description parameter.
    if ($SiteType -ne "TeamSite" -and $Description -ne "") {
        Set-PnPWeb -Description $Description -Connection $siteConn
        Write-Output "INFO: Description applied via Set-PnPWeb"
    }

    # ── Add site collection admins ────────────────────────────────────────────
    #
    # New-PnPSite -Owner already sets PrimaryOwnerEmail as site collection admin.
    # We call Add-PnPSiteCollectionAdmin to also add SecondaryOwner when provided.
    # The Managed Identity account is also an admin via its SharePoint Admin role —
    # that's expected; it won't appear in the SharePoint "Site admins" UI as a named user.
    # -Owners accepts a string (UPN) or array of strings.

    if ($SecondaryOwnerEmail -ne "") {
        Add-PnPSiteCollectionAdmin -Owners @($SecondaryOwnerEmail) -Connection $siteConn
        Write-Output "INFO: Secondary admin set: $SecondaryOwnerEmail"
    }

    # ── Apply template-specific structure ─────────────────────────────────────
    #
    # Each template adds the lists and folder structure appropriate to that team type.
    # -ErrorAction SilentlyContinue on New-PnPList prevents duplicate-name errors
    # if this runbook is re-run on the same site (e.g. after a partial failure).

    switch ($Template) {
        "Project Team" {
            # Project sites: task tracking + risk register + structured document folders
            New-PnPList -Title "Project Tasks" -Template GenericList `
                -ErrorAction SilentlyContinue -Connection $siteConn
            New-PnPList -Title "Risk Register" -Template GenericList `
                -ErrorAction SilentlyContinue -Connection $siteConn
            Add-PnPFolder -Name "Project Plans"  -Folder "Shared Documents" -Connection $siteConn
            Add-PnPFolder -Name "Deliverables"   -Folder "Shared Documents" -Connection $siteConn
            Add-PnPFolder -Name "Meeting Notes"  -Folder "Shared Documents" -Connection $siteConn
            Add-PnPFolder -Name "Archive"        -Folder "Shared Documents" -Connection $siteConn
        }
        "HR Department" {
            # HR sites: job postings list + policy-focused document structure
            New-PnPList -Title "Job Postings" -Template GenericList `
                -ErrorAction SilentlyContinue -Connection $siteConn
            Add-PnPFolder -Name "Policies"   -Folder "Shared Documents" -Connection $siteConn
            Add-PnPFolder -Name "Templates"  -Folder "Shared Documents" -Connection $siteConn
            Add-PnPFolder -Name "Archive"    -Folder "Shared Documents" -Connection $siteConn
            # HR sharing is set to Disabled further below using $adminConn
        }
        "IT Service Desk" {
            # IT sites: tickets + known issues + operational runbooks
            New-PnPList -Title "Tickets"      -Template GenericList `
                -ErrorAction SilentlyContinue -Connection $siteConn
            New-PnPList -Title "Known Issues" -Template GenericList `
                -ErrorAction SilentlyContinue -Connection $siteConn
            Add-PnPFolder -Name "Runbooks"   -Folder "Shared Documents" -Connection $siteConn
            Add-PnPFolder -Name "Procedures" -Folder "Shared Documents" -Connection $siteConn
        }
        default {
            # General: minimal structure — two folders, no extra lists
            Add-PnPFolder -Name "Working Documents" -Folder "Shared Documents" -Connection $siteConn
            Add-PnPFolder -Name "Archive"           -Folder "Shared Documents" -Connection $siteConn
        }
    }
    Write-Output "INFO: Template '$Template' applied"

    # ── Set sharing policy ────────────────────────────────────────────────────
    #
    # IMPORTANT: Set-PnPTenantSite must use $adminConn — it calls the SPO Tenant
    # Admin REST API at *-admin.sharepoint.com. Calling it with $siteConn (the
    # regular site connection) will throw "Access denied" or silently do nothing.
    #
    # SharingCapability values:
    #   Disabled                        = no external sharing whatsoever
    #   ExistingExternalUserSharingOnly = existing guests only, no new invites
    #   ExternalUserSharingOnly         = authenticated external users
    #   ExternalUserAndGuestSharing     = anyone (including anonymous links)

    if ($Template -eq "HR Department") {
        # HR sites must never be accessible to anyone outside the organisation
        Set-PnPTenantSite -Url $siteFullUrl `
            -SharingCapability Disabled `
            -Connection $adminConn
        Write-Output "INFO: External sharing disabled (HR policy)"
    } else {
        # All other templates: existing guests may access, but no new external invites
        Set-PnPTenantSite -Url $siteFullUrl `
            -SharingCapability ExistingExternalUserSharingOnly `
            -Connection $adminConn
        Write-Output "INFO: Sharing set to ExistingExternalUserSharingOnly"
    }

    # ── Signal success ────────────────────────────────────────────────────────
    #
    # The Logic App reads the job output stream via "Get job output", which returns
    # all Write-Output lines as a single newline-delimited string in body('Get_job_output')?['value'].
    # Because the output contains multiple INFO: lines, a simple replace() would corrupt it.
    # The Logic App expression to extract only the URL is:
    #
    #   @{trim(last(split(body('Get_job_output')?['value'], 'PROVISIONED:')))}
    #
    # This splits the output on "PROVISIONED:" and takes the last segment — the URL.
    # trim() removes any trailing newline characters.
    #
    # The PROVISIONED: prefix must be unique in the output — do not use it in any
    # other Write-Output statement in this runbook.

    Write-Output "PROVISIONED:$siteFullUrl"

} catch {
    # $_.Exception.Message contains the PnP / SharePoint REST error text.
    # Re-throwing the exception causes the Automation job to end with status
    # "Failed", which the Logic App Do-Until loop detects and routes to the
    # Catch scope — which logs the error and sends the failure email.

    $msg = $_.Exception.Message
    Write-Error "FAILED | RequestID=$RequestItemId | $siteFullUrl | $msg"
    throw "Provisioning failed for $siteFullUrl — $msg"
}
The key design decisions in this runbook:
$adminConn, $siteConn) — Set-PnPTenantSite is a tenant-admin operation that must use the admin URL connection. Mixing connections without explicit -Connection parameters is the most common PnP runbook bug and usually shows as a silent no-op or 403.$ErrorActionPreference = 'Stop' — makes all errors terminating so the catch block always fires. Without it, some cmdlet failures only write to the error stream and the runbook keeps running and reports success.-Wait on New-PnPSite — blocks until the site is fully provisioned. Without it, Connect-PnPOnline to the new site fires before the site exists and fails with a 404.CommunicationSite accepts -SiteDesign but NOT -Description; TeamSiteWithoutMicrosoft365Group accepts neither; TeamSite (group-connected) uses -Alias (not -Url) and DOES accept -Description. Passing the wrong parameter for a given type throws ParameterBindingException immediately.Set-PnPWeb -Description (not Set-PnPSite) — Set-PnPSite has no -Description parameter. Set-PnPWeb sets the web-level description property and works correctly for both CommunicationSite and TeamSiteWithoutMicrosoft365Group after connecting.-ErrorAction SilentlyContinue on New-PnPList — prevents duplicate-name exceptions if the runbook is re-run against the same site after a partial failure (idempotent re-runs).| Error | Cause | Fix |
|---|---|---|
| ParameterBindingException: -Description | Passing -Description to CommunicationSite or TeamSiteWithoutMicrosoft365Group | Remove -Description from New-PnPSite; apply via Set-PnPWeb -Description after connecting |
| ParameterBindingException: -Url | Passing -Url to TeamSite (group-connected) | Use -Alias $SiteUrlAlias instead — PnP constructs the URL automatically |
| 403 Access Denied on Set-PnPTenantSite | Set-PnPTenantSite called with site connection instead of admin connection | Explicitly pass -Connection $adminConn |
| 404 on Connect-PnPOnline to new site | -Wait omitted on New-PnPSite | Add -Wait to all three New-PnPSite calls |
| Runbook shows Completed but site not created | $ErrorActionPreference left at default (Continue) | Set $ErrorActionPreference = 'Stop' at the top of the runbook |
| Set-PnPSite: parameter -Description not found | Using Set-PnPSite to set description | Use Set-PnPWeb -Description $Description -Connection $siteConn |
| Alias conflict: Group already exists | TeamSite -Alias conflicts with an existing M365 Group alias | Validate alias uniqueness against M365 Groups (not just SharePoint) — use Get-MgGroup -Filter "mailNickname eq '$SiteUrlAlias'" in the Logic App before invoking the runbook |
Errors are inevitable — a site URL with a reserved word triggers a 409, a transient Microsoft API hiccup returns a 503, the PnP module has a version mismatch. The pipeline is designed so that none of these errors silently disappear.
The Logic App's Catch scope creates a row in the Site Provision Logs list. The key expressions used in that action are:
# Title column — unique, sortable identifier for each log row
ERR-@{variables('requestItemId')}-@{formatDateTime(utcNow(),'yyyyMMdd-HHmmss')}

# RequestID column — links back to the originating Site Requests list row
@{variables('requestItemId')}

# FailedStep column — name of the specific Logic App action that failed
# result('Try') returns ALL actions; filter() isolates the first one with status=Failed
@{first(filter(result('Try'), item()?['status'] == 'Failed'))?['name']}

# ErrorMessage column — human-readable message from the failed action
@{first(filter(result('Try'), item()?['status'] == 'Failed'))?['error']?['message']}

# RawError column — full error code for deep debugging
@{first(filter(result('Try'), item()?['status'] == 'Failed'))?['error']?['code']}

# RunbookJobID column — paste this into Azure Automation → Jobs for the full PS output
@{variables('runbookJobId')}

# LogLevel column — hardcode to "Error" for all Catch scope entries
Error
With these entries in the log list, an admin can:
Retention tip: Apply a SharePoint retention label to the Provision Logs list that deletes rows older than 12 months. This keeps the list fast to query and stops it growing unbounded over time.
Every outcome sends the requester an email. Build all three using the Send an email (V2) action from the Office 365 Outlook connector — one in the Logic App Try scope (success), one in Power Automate's rejected branch, and one in the Logic App Catch scope (failure). The Logic App expressions for each dynamic field are included below.
Hi @{first(split(body('Parse_JSON')?['primaryOwnerEmail'], '.'))},
Your new SharePoint site has been created and is ready to use.
Site name: @{body('Parse_JSON')?['siteTitle']}
URL: @{trim(last(split(body('Get_job_output')?['value'], 'PROVISIONED:')))}
Template applied: @{body('Parse_JSON')?['template']}
Site type: @{body('Parse_JSON')?['siteType']}
Getting started: Sign in, invite your team via Settings > Site permissions, and review the default document library structure that was set up for you.
Questions? Contact the IT helpdesk and quote your request ID: @{variables('requestItemId')}
Hi @{triggerOutputs()?['body/Author/DisplayName']},
Your request for a SharePoint site named @{triggerOutputs()?['body/Title']} was reviewed by @{outputs('Get_manager_(V2)')?['body/displayName']} and was not approved at this time.
Manager's comment: @{outputs('Start_and_wait_for_an_approval')?['body/responses'][0]?['comments']}
You can amend and resubmit your request via the Site Requests list. If you believe this decision was made in error, please speak to your manager directly.
Hi @{first(split(body('Parse_JSON')?['requesterEmail'], '@'))},
We ran into a technical problem while creating your SharePoint site @{body('Parse_JSON')?['siteTitle']}. Our team has been notified automatically.
Reference number: @{variables('requestItemId')}
Failed step: @{first(filter(result('Try'), item()?['status'] == 'Failed'))?['name']}
Error: @{first(filter(result('Try'), item()?['status'] == 'Failed'))?['error']?['message']}
You do not need to resubmit — the IT team will investigate and either resolve the issue or contact you within one business day. To escalate, quote reference @{variables('requestItemId')} to the helpdesk.
Approval comment expression: In the rejection email, the manager's comment is accessed via @{outputs('Start_and_wait_for_an_approval')?['body/responses'][0]?['comments']}. The [0] index returns the first (and only) response since we used "First to respond" approval type.
Before going live, run each scenario deliberately. Don't rely on happy-path testing alone — the error paths are the most important to verify.
| Test scenario | How to trigger it | Expected outcome |
|---|---|---|
| Happy path | Submit a valid request with a fresh URL alias and approve it | Site provisioned, success email received, Status = Provisioned, ProvisionedURL populated |
| Rejection | Submit a request and reject it in the approval card with a comment | Status = Rejected, ManagerNotes populated, rejection email with reason delivered |
| URL conflict | Submit a request using the alias of an existing site | Logic App exits early, error log entry created, "URL taken" email sent to requester |
| Runbook failure | Temporarily revoke the Managed Identity's SharePoint permission, then submit and approve a request | Catch scope fires, error logged to Provision Logs with the auth error, failure email sent |
| Approval timeout | Reduce the approval timeout to PT2M for testing, do not respond | Reminder email to manager, holding email to requester delivered after timeout |
After each test, verify three things: the SharePoint item Status column updated correctly, the correct email was received by the requester, and (for failure cases) a row appeared in the Provision Logs list with the right content.
Understanding where time is spent helps you set accurate expectations with requesters and choose appropriate Logic App polling intervals.
| Stage | Controller | Typical duration | Notes |
|---|---|---|---|
| User submits request form | User | 1–3 min | Filling the SharePoint list form including business purpose |
| Power Automate trigger + validation | Automated | 30–90 sec | Trigger latency plus URL alias validation + manager lookup |
| Manager approval | Manager | 0 min – 48 hrs | Fastest with Teams Adaptive Card; slowest via email only |
| Logic App setup + URL check | Automated | 5–15 sec | Graph API call to check URL availability |
| Azure Automation job creation | Automated | 5–10 sec | Job queuing and worker allocation |
| PnP PowerShell runbook execution | Automated | 2–5 min | Site creation + template structure + sharing policy |
| Logic App polling + notifications | Automated | 30–90 sec | 30s poll interval + email delivery |
| Total (happy path, instant approval) | 3–7 minutes | From form submission to success email |
Reduce cold-start time: Azure Automation has a ~30-second job startup latency on the first run after a period of inactivity. For consistently faster provisioning, set the Logic App's Do-Until loop initial Delay to 60 seconds (not 30) to avoid polling before the job has started. This eliminates one wasted polling iteration without adding perceived latency.
A provisioning pipeline creates sites quickly — which means it also creates governance debt quickly if left unchecked.
Before even routing for approval, add a Condition in the Power Automate flow that validates the URL alias against a regex: ^[a-z0-9][a-z0-9\-]{0,38}[a-z0-9]$. If it fails, immediately set Status = Failed and send the requester a validation error email, saving the manager from approving something that will always fail at the runbook stage.
Maintain a small SharePoint list of reserved prefixes (e.g. hr-, legal-, exec-) that require IT sign-off before provisioning. The Logic App checks the alias against this list before invoking the runbook, and if matched, flags the item for manual review.
Every provisioned site should have an expected lifetime. Add an ExpectedExpiryDate date column to the Site Requests list and populate it at provisioning time based on template type (Project = 18 months, HR = no expiry, General = 12 months). A separate scheduled Power Automate flow queries for sites expiring within 30 days and emails the primary owner to either extend or confirm deletion.
If a requester needs Microsoft Teams alongside the SharePoint site, change the runbook's New-PnPSite call to use -Type TeamSite (which creates an M365 Group-connected site) and add a New-Team call via the Microsoft Teams PowerShell module. Surface this as a "Create linked Teams team?" Yes/No toggle in the request form — the Logic App passes it as a parameter to the runbook.
OceanCloud delivers production-ready SharePoint provisioning pipelines as part of our Power Platform and admin automation practice — including custom templates, governance policies, and lifecycle management.
Book a Free Discovery Call →SharePoint site provisioning automation is a pipeline that creates new SharePoint sites on demand without requiring IT to manually build each one.
Requestors fill out a form or submit a list item; an approval flow validates the request; then an automated process (Azure Logic App, PnP PowerShell runbook, or Power Automate) creates the site with the correct template, permissions, and metadata.
Use a SharePoint request list as the intake queue. Capture requester, business owner, department, site purpose, template type, sensitivity, expiry date, and approval status.
Power Automate can route approval before the Logic App or runbook creates the site, and the same list becomes the audit trail for every provisioning decision.
The core components are: a SharePoint request list (intake form), a Power Automate approval flow (manager sign-off), an Azure Automation runbook with PnP PowerShell (site creation and configuration), and a status column in the request list (tracks pending/approved/created states).
Optional additions include Azure Logic Apps as an orchestrator and a SharePoint site template (.pnp file) for consistent structure.
Power Automate can trigger the site creation process and handle approvals, but creating a full site collection with custom templates, hub site association, and metadata configuration typically requires the PnP.PowerShell module or the SharePoint REST API via the 'Send an HTTP request to SharePoint' action.
Simple modern team sites or communication sites can be created via the Graph API from Power Automate.
Create a reference site with the desired structure (columns, content types, libraries, pages), export it as a PnP template with Export-PnPSiteTemplate, then apply that template to every new site with Invoke-PnPSiteTemplate during provisioning.
Hub site association, navigation links, and sensitivity labels can also be set programmatically in the same runbook.
The Azure Automation account needs a Managed Identity or service principal with SharePoint admin permissions granted in Microsoft Entra.
In the SharePoint admin center, add the managed identity as a SharePoint admin or grant it Sites.FullControl.All application permission via Microsoft Graph. No user credentials should be stored in the runbook — use the managed identity exclusively.
OceanCloud specialises in SharePoint consulting, M365 migration, Power Platform solutions, and enterprise governance. Let's discuss how we can help.
Book a Free 60-Minute Consultation ➜PnP PowerShell and REST API templates for automation.