How to Build a SharePoint Approval Workflow with Power Automate
Configure the approval action, handle approve and reject responses, notify requesters automatically, and keep your SharePoint list status in sync — step by step.
Configure the approval action, handle approve and reject responses, notify requesters automatically, and keep your SharePoint list status in sync — step by step.
SharePoint approval workflows are one of the most requested Power Automate builds — and one of the most commonly built incorrectly. Developers skip the status column, forget the rejection branch, or build flows that break when the approver is out of office. This guide builds a complete, production-ready SharePoint document approval workflow from scratch, covering every step from list setup through edge-case handling.
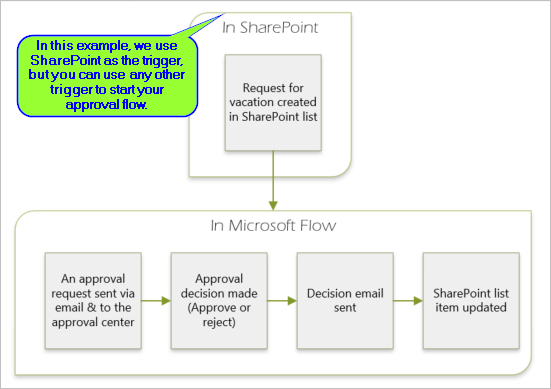
A Power Automate cloud flow that triggers when a document is submitted to a SharePoint library, sends the configured approver a structured approval request in Microsoft Teams and email, waits for a response, and then:
Before building the flow, configure the SharePoint document library with the columns the flow will read and write. Without these columns, the flow cannot track state or surface approver comments.
| Column name | Type | Values / notes |
|---|---|---|
| Approval Status | Choice | Pending Review, Approved, Rejected, Recall — default to "Pending Review" |
| Approver | Person or Group | Single selection; allow only people, not groups |
| Approver Comments | Multiple lines of text | Flow writes rejection reason here |
| Submitted By | Person or Group | Auto-populated; flow reads this to send notifications |
| Submitted Date | Date and Time | Set to Today by default; used in the approval request card |
Tip: Set the Approver column as Required in the library settings. This forces submitters to select an approver before uploading, preventing the flow from failing due to a null approver field.
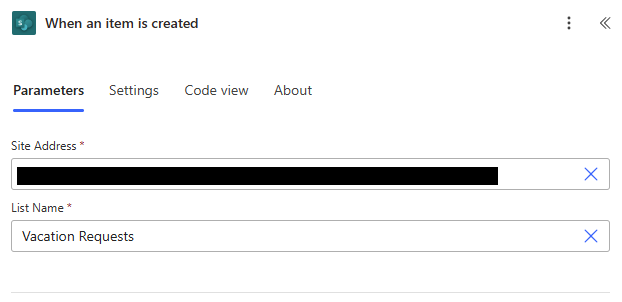
Go to make.powerautomate.com, select Create > Automated cloud flow, and search for the trigger "When a file is created or modified (properties only)". This trigger fires whenever a file's metadata changes in the library — which means it fires when the Approval Status is set to "Pending Review" on upload.
Trigger choice matters: Use "When a file is created or modified (properties only)" rather than "When a file is created in a folder." The properties-only version is lighter weight (transfers only metadata, not file content) and fires reliably on both new uploads and column updates. The alternative triggers can double-fire or miss events.
Because the trigger fires on any property change — including when the flow itself updates the Status column to "Approved" or "Rejected" — you must add a condition immediately after the trigger to stop infinite loops:
Set the No branch of this condition to "Terminate" (action: Terminate, Status: Succeeded). Only the Yes branch continues to the approval logic.
📄 Manage approval requests in Power Automate — learn.microsoft.com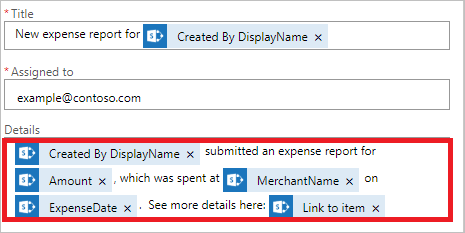
In the Yes branch, add the action "Start and wait for an approval" from the Approvals connector. This is a blocking action — the flow pauses here until the approver responds (or the timeout expires).
| Field | Value / expression |
|---|---|
| Approval type | Approve/Reject — First to respond |
| Title | Document Approval Required: @{triggerOutputs()?['body/{FilenameWithExtension}']} |
| Assigned to | @{triggerOutputs()?['body/Approver/Email']} |
| Details | Document name, submitted by, submission date, library link |
| Item link | @{triggerOutputs()?['body/{Link}']} — direct link to the file |
| Item link description | View document |
The approver receives this request in their Approvals app in Microsoft Teams (and email). They can approve or reject with comments directly from Teams without opening any other system.
📄 Create and test an approval workflow — learn.microsoft.comAfter the approval action completes, add a Condition to branch on the outcome:
Action: "Update file properties" (SharePoint) — set Approval Status = "Approved"
Action: "Copy file" to /Approved subfolder, then "Delete file" from root — or use "Move file" if your connector version supports it
Action: "Post a message in a chat" (Teams) — send a direct message to the Submitted By user: "Your document [name] has been approved by [approver name]."
Action: "Update file properties" — set Approval Status = "Rejected"; set Approver Comments = @{outputs('Start_and_wait_for_an_approval')?['body/responses'][0]['comments']}
Action: "Post a message in a chat" (Teams) — include the rejection comments so the submitter knows exactly what to change: "Your document [name] was not approved. Comments: [comments]"
The "Start and wait for an approval" action will wait indefinitely by default. In production, this creates flows that are stuck for weeks because an approver went on holiday or ignored the request. Set a timeout to prevent this.
In the approval action's settings, enable "Set a timeout" and use ISO 8601 duration format:
P3D — 3 days (good for most document approvals)P7D — 7 days (for lower-priority reviews)PT4H — 4 hours (for urgent time-sensitive approvals)In the timeout branch, update the Status to "Escalated" and notify the submitter and the approver's manager that the approval is overdue. This keeps the process moving without manual chasing.
/Email property from the Person columnresponses[0]['comments'] to retrieve them — it is not automatically written anywhereBefore enabling for all users, test the complete flow end-to-end:
OceanCloud builds production-ready SharePoint approval workflows with multi-approver support, delegation, escalation, and Power BI reporting on approval cycle times — typically delivered in 1–2 weeks.
Get a Free Workflow ReviewCreate a flow triggered by 'When a file is created or modified' on your SharePoint library.
Add a 'Start and wait for an approval' action, configure the approver, subject, and item link. Then use a Condition to check if the outcome is 'Approve' or 'Reject', and update a Status column in SharePoint with the result.
Yes. In the 'Start and wait for an approval' action, set the approval type to 'Approve/Reject - First to respond' or 'Custom responses'.
Use the Teams connector to post the approval card. Approvers receive an actionable card directly in Teams and can approve without leaving the app.
Without a timeout, the approval waits indefinitely.
Add a 'Start and wait for an approval' action inside a 'Do until' loop with a timeout expression, or use the built-in 'Request options' to set an expiry duration. When the timeout fires, update the document status to 'Escalated' or 'Timed Out' and notify the approver's manager.
After the approval action returns, use a Condition to check the outcome value.
In each branch, add an 'Update file properties' action targeting the same library item. Use the 'ID' from the trigger output to identify the correct item, and set your Status, Approval Date, or Approver Name columns accordingly.
Yes.
Power Automate provides the full approval history (approver, response, date, comments) in the approval action outputs. Log this to a separate SharePoint list using a 'Create item' action, or use the built-in Microsoft 365 Compliance features to retain approval records in the audit log.
OceanCloud specialises in SharePoint consulting, M365 migration, Power Platform solutions, and enterprise governance. Let's discuss how we can help.
Book a Free 60-Minute Consultation ➜