Fix ExportPkcs8PrivateKey in PowerShell 5.1 for Entra App Certificates
Create PFX, CER, cert.pem, key.pem, and combined.pem for PnP PowerShell app-only authentication, with a safe fallback when Windows PowerShell 5.1 cannot export PEM private keys.
Create PFX, CER, cert.pem, key.pem, and combined.pem for PnP PowerShell app-only authentication, with a safe fallback when Windows PowerShell 5.1 cannot export PEM private keys.
If your automation uses Connect-PnPOnline with Entra app registration, certificate-based authentication is usually the most stable option. This guide gives you a practical script that generates all common certificate outputs used in real projects: .pfx, .cer, cert.pem, key.pem, and combined.pem. It also explains why ExportPkcs8PrivateKey() fails in Windows PowerShell 5.1 and how to avoid that failure without breaking certificate creation.
Compatibility scope: this script is built for Windows PowerShell 5.1 and PowerShell 7 on Windows. The New-SelfSignedCertificate cmdlet is Windows-specific.
Before running any script, create an app registration in Microsoft Entra admin center, note the Application (client) ID and Directory (tenant) ID, and upload the generated .cer file under Certificates & secrets. Never upload the .pfx file.
Need the full registration walkthrough? Use our PnP PowerShell Entra app registration guide. If your app is already registered and you already have the required IDs and API permissions, skip app creation and continue from certificate upload in this guide.
pnp-apponly.cer, then select Add.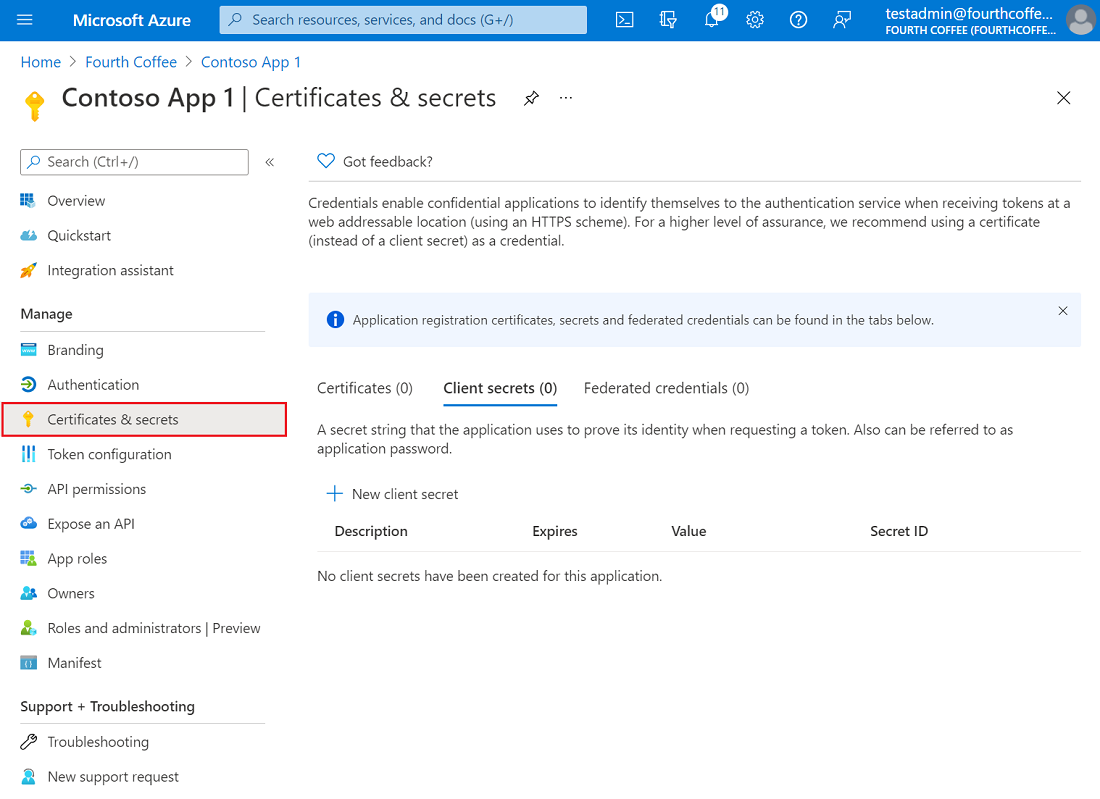
.cer file.Important: upload only the public .cer file to Entra. Keep the private .pfx file in a secure location and use it only from your automation runtime.
Post-upload check: copy the uploaded certificate thumbprint from Entra and compare it with your script output thumbprint. If they do not match, the wrong certificate was uploaded.
| Model | How it runs | Best for | Common PnP pattern |
|---|---|---|---|
| Delegated | Acts as signed-in user identity | Interactive admin tasks and testing | Connect-PnPOnline -Interactive -ClientId ... |
| Application | Acts as app identity (no user) | Scheduled jobs, runbooks, CI/CD | Connect-PnPOnline -CertificatePath ... |
For unattended scripts, use application permissions. For one-off manual administration, delegated can be fine. Mixing them without design is a common root cause of "connected but access denied" problems.
This version keeps your original intent but makes private-key PEM export safe across runtimes. The PFX and CER files always generate on both Windows PowerShell 5.1 and PowerShell 7. For key.pem and combined.pem, the script uses native .NET export on PowerShell 7, falls back to OpenSSL on Windows PowerShell 5.1, and simply warns (instead of failing) if neither path is available — because Entra only needs the .cer and PnP uses the .pfx.
Why the fallback exists: the managed methods ExportPkcs8PrivateKey() and ExportRSAPrivateKey() only exist on the .NET runtime used by PowerShell 7. Windows PowerShell 5.1 runs on .NET Framework, which cannot export the private key in managed code, so OpenSSL (or PowerShell 7) is required to produce PEM key files.
# ===== Generate PFX/CER and PEMs for Entra App Registration =====
# Compatible with Windows PowerShell 5.1 and PowerShell 7 (Windows)

# --- Hardcoded settings
$OutDir      = "C:\Secure\Certs"
$SubjectCN   = "PnP-App-registration"
$YearsValid  = 10
$PfxPassword = "ChangeMeBeforeUse!"

if ([string]::IsNullOrWhiteSpace($PfxPassword)) {
    throw "Set a non-empty PFX password before running this script."
}

if (-not $IsWindows -and $PSVersionTable.PSVersion.Major -ge 6) {
    throw "This script uses New-SelfSignedCertificate, which requires Windows."
}

# --- Prep output
if (-not (Test-Path $OutDir)) {
    New-Item -ItemType Directory -Path $OutDir -Force | Out-Null
}

$pfxPath     = Join-Path $OutDir "pnp-apponly.pfx"
$cerPath     = Join-Path $OutDir "pnp-apponly.cer"
$certPemPath = Join-Path $OutDir "cert.pem"
$keyPemPath  = Join-Path $OutDir "key.pem"
$combinedPem = Join-Path $OutDir "combined.pem"

function To-PemBlock {
    param(
        [Parameter(Mandatory)][string]$Label,
        [Parameter(Mandatory)][byte[]]$Bytes
    )
    $b64 = [Convert]::ToBase64String($Bytes, [System.Base64FormattingOptions]::InsertLineBreaks)
    return "-----BEGIN $Label-----`n$b64`n-----END $Label-----`n"
}

function Get-PrivateKeyPem {
    param([Parameter(Mandatory)]$Certificate)

    $rsa = [System.Security.Cryptography.X509Certificates.RSACertificateExtensions]::GetRSAPrivateKey($Certificate)
    $ecdsa = $null
    if (-not $rsa) {
        $ecdsa = [System.Security.Cryptography.X509Certificates.ECDsaCertificateExtensions]::GetECDsaPrivateKey($Certificate)
    }

    if ($rsa) {
        if ($rsa.GetType().GetMethod("ExportPkcs8PrivateKey")) {
            return To-PemBlock -Label "PRIVATE KEY" -Bytes ($rsa.ExportPkcs8PrivateKey())
        }
        if ($rsa.GetType().GetMethod("ExportRSAPrivateKey")) {
            return To-PemBlock -Label "RSA PRIVATE KEY" -Bytes ($rsa.ExportRSAPrivateKey())
        }
        return $null   # .NET Framework (Windows PowerShell 5.1): no managed key export
    }

    if ($ecdsa) {
        if ($ecdsa.GetType().GetMethod("ExportPkcs8PrivateKey")) {
            return To-PemBlock -Label "PRIVATE KEY" -Bytes ($ecdsa.ExportPkcs8PrivateKey())
        }
        if ($ecdsa.GetType().GetMethod("ExportECPrivateKey")) {
            return To-PemBlock -Label "EC PRIVATE KEY" -Bytes ($ecdsa.ExportECPrivateKey())
        }
        return $null
    }

    return $null
}

# --- Create self-signed certificate (CurrentUser\My)
$notAfter = (Get-Date).AddYears($YearsValid)
$cert = New-SelfSignedCertificate `
    -Subject "CN=$SubjectCN" `
    -KeyAlgorithm RSA -KeyLength 3072 `
    -KeyExportPolicy Exportable `
    -KeyUsage DigitalSignature, KeyEncipherment `
    -Provider "Microsoft Enhanced RSA and AES Cryptographic Provider" `
    -CertStoreLocation "Cert:\CurrentUser\My" `
    -NotAfter $notAfter `
    -HashAlgorithm SHA256

if (-not $cert) {
    throw "Failed to create self-signed certificate."
}
Write-Host "Created cert. Thumbprint: $($cert.Thumbprint)" -ForegroundColor Green

# --- Export PFX & CER
$secPwd = ConvertTo-SecureString -String $PfxPassword -AsPlainText -Force
Export-PfxCertificate -Cert $cert -FilePath $pfxPath -Password $secPwd -Force | Out-Null
Export-Certificate -Cert $cert -FilePath $cerPath -Force | Out-Null
Write-Host "Exported PFX: $pfxPath" -ForegroundColor Cyan
Write-Host "Exported CER: $cerPath" -ForegroundColor Cyan

# --- Reopen PFX with private key (exportable) for PEM creation
$pfxBytes = [IO.File]::ReadAllBytes($pfxPath)
$x509 = [System.Security.Cryptography.X509Certificates.X509Certificate2]::new(
    $pfxBytes,
    $PfxPassword,
    [System.Security.Cryptography.X509Certificates.X509KeyStorageFlags]::Exportable
)

# --- cert.pem (certificate)
$derCert = $x509.Export([System.Security.Cryptography.X509Certificates.X509ContentType]::Cert)
$certPem = To-PemBlock -Label "CERTIFICATE" -Bytes $derCert
[IO.File]::WriteAllText($certPemPath, $certPem, [Text.Encoding]::ASCII)
Write-Host "Exported cert.pem" -ForegroundColor Cyan

# --- key.pem (private key)
# Native managed export works on PowerShell 7+. Windows PowerShell 5.1
# (.NET Framework) cannot export the key in managed code, so it falls back
# to OpenSSL when available; otherwise key.pem is skipped (PFX/CER are all
# Entra needs).
$keyPem = Get-PrivateKeyPem -Certificate $x509

if ($keyPem) {
    [IO.File]::WriteAllText($keyPemPath, $keyPem, [Text.Encoding]::ASCII)
}
elseif (Get-Command openssl -ErrorAction SilentlyContinue) {
    Write-Host "Using OpenSSL fallback for key.pem (PowerShell 5.1)..." -ForegroundColor Yellow
    & openssl pkcs12 -in $pfxPath -nocerts -nodes -out $keyPemPath -passin "pass:$PfxPassword" 2>$null
    if (-not (Test-Path $keyPemPath)) {
        # OpenSSL 3.x often needs -legacy for a Windows-exported PFX
        & openssl pkcs12 -in $pfxPath -nocerts -nodes -legacy -out $keyPemPath -passin "pass:$PfxPassword" 2>$null
    }
}

if (Test-Path $keyPemPath) {
    Write-Host "Exported key.pem" -ForegroundColor Cyan

    # --- combined.pem (cert + key)
    $keyPemText = Get-Content -Raw -Path $keyPemPath
    [IO.File]::WriteAllText($combinedPem, ($certPem + $keyPemText), [Text.Encoding]::ASCII)
    Write-Host "Exported combined.pem" -ForegroundColor Cyan
}
else {
    Write-Warning "key.pem/combined.pem skipped. Run on PowerShell 7 or install OpenSSL to generate PEM private keys. PFX and CER are ready for Entra."
}

# --- Summary
Write-Host "`n==== Summary ====" -ForegroundColor Yellow
Write-Host ("PFX:      {0}" -f $pfxPath)
Write-Host ("CER:      {0}" -f $cerPath)
Write-Host ("cert.pem: {0}" -f $certPemPath)
if (Test-Path $keyPemPath)  { Write-Host ("key.pem:  {0}" -f $keyPemPath) }
if (Test-Path $combinedPem) { Write-Host ("combined: {0}" -f $combinedPem) }
Write-Host ("Thumbprint: {0}" -f $cert.Thumbprint)
Write-Host ("Subject:  {0}" -f $SubjectCN)
Write-Host ("Valid to: {0:yyyy-MM-dd}" -f $notAfter)If your runbook or scheduled task uses -Thumbprint, the certificate must be installed in the certificate store of the account that runs the job. If you use -CertificatePath, you can keep the PFX as a file instead.
pnp-apponly.pfx in a protected folder on the automation machine.Connect-PnPOnline -CertificatePath with a secure password source.Mandatory for thumbprint mode: -Thumbprint works only when that certificate is installed in the local certificate store of the same Windows identity running the script (user account, service account, or task account).
$pfxPath = "C:\Secure\Certs\pnp-apponly.pfx"
$pfxPassword = ConvertTo-SecureString -String "ChangeMeBeforeUse!" -AsPlainText -Force

Import-PfxCertificate `
  -FilePath $pfxPath `
  -CertStoreLocation "Cert:\CurrentUser\My" `
  -Password $pfxPassword | Out-Null

# Verify it exists
Get-ChildItem "Cert:\CurrentUser\My" |
  Where-Object Subject -like "*PnP-App-registration*" |
  Select-Object Subject, Thumbprint, NotAfter
$cert = Get-ChildItem "Cert:\CurrentUser\My" |
  Where-Object Subject -like "*PnP-App-registration*" |
  Sort-Object NotAfter -Descending |
  Select-Object -First 1

$cert.Thumbprint
For service or machine-wide jobs, import to Cert:\LocalMachine\My and ensure the runtime identity has permission to use the private key.
After app registration and certificate upload, you need four values for reliable app-only auth:
contoso.onmicrosoft.com) or tenant ID.CertificatePath + password, or Thumbprint.$pfxPassword = ConvertTo-SecureString -String "ChangeMeBeforeUse!" -AsPlainText -Force Connect-PnPOnline ` -Url "https://contoso.sharepoint.com" ` -ClientId "xxxxxxxx-xxxx-xxxx-xxxx-xxxxxxxxxxxx" ` -Tenant "contoso.onmicrosoft.com" ` -CertificatePath "C:\Secure\Certs\pnp-apponly.pfx" ` -CertificatePassword $pfxPassword
Connect-PnPOnline `
  -Url "https://contoso.sharepoint.com" `
  -ClientId "xxxxxxxx-xxxx-xxxx-xxxx-xxxxxxxxxxxx" `
  -Tenant "contoso.onmicrosoft.com" `
  -Thumbprint "AAAAAAAAAAAAAAAAAAAAAAAAAAAAAAAAAAAAAAAA"
Operational tip: if scheduled automation fails with certificate errors, check that the cert is installed for the same identity running the job and that the thumbprint exactly matches the uploaded Entra certificate.
pnp-apponly.pfx private.pnp-apponly.cer to Entra app registration.$pfxPassword = ConvertTo-SecureString -String "ChangeMeBeforeUse!" -AsPlainText -Force Connect-PnPOnline ` -Url "https://contoso.sharepoint.com" ` -ClientId "xxxxxxxx-xxxx-xxxx-xxxx-xxxxxxxxxxxx" ` -Tenant "contoso.onmicrosoft.com" ` -CertificatePath "C:\Secure\Certs\pnp-apponly.pfx" ` -CertificatePassword $pfxPassword
Security recommendation: avoid hardcoding certificate passwords in scripts. For production, load secrets from environment variables, Azure Key Vault, or your secure secret manager.
*.FullControl.All where possible.OceanCloud can help you standardize app registration, certificate rotation, and least-privilege API permissions for production automation.
Book a Security ReviewClient secrets expire (maximum 24 months) and must be manually rotated — a missed rotation breaks all connected automations.
Certificates can have longer validity, are bound to a specific device or key vault, and their private key never leaves the secure store. For production automation, certificates are the Microsoft-recommended approach.
ExportPkcs8PrivateKey() is available on the newer .NET runtime used by PowerShell 7, but Windows PowerShell 5.1 runs on .NET Framework.
Use PowerShell 7 when you need native PEM private-key export. If you must stay on Windows PowerShell 5.1, generate the PFX and CER normally, then let the script use OpenSSL as the fallback for key.pem.
Yes.
Self-signed certificates are acceptable for server-to-server authentication with Microsoft Entra ID because the trust relationship is established by uploading the certificate's public key to the app registration — not by a third-party CA chain. The certificate just needs to be valid (not expired) and its private key must be available to the script at runtime.
The most secure options are: Azure Key Vault (access via managed identity, no credential in code), the Windows Certificate Store on the automation server (LocalMachine\My), or a CI/CD secrets manager (GitHub Actions secrets, Azure DevOps secure files).
Never store certificate PFX files or passwords in source code repositories.
Microsoft Entra ID accepts certificates valid for up to 3 years (some tenants allow longer).
A 2-year validity is a common balance between rotation frequency and operational overhead. Set a calendar reminder 60 days before expiry to generate a new certificate, upload its public key to the app registration, and update the private key on all automation hosts before the old one expires.
On Windows, New-SelfSignedCertificate requires running PowerShell as Administrator when writing to the LocalMachine certificate store.
Writing to the CurrentUser store does not require elevation. On Linux/macOS with PowerShell 7, use the openssl command-line tool instead, as New-SelfSignedCertificate is a Windows-only cmdlet.
Implementation path: Use certificate authentication with least privilege, documented ownership, expiry monitoring, and a tested rotation procedure. SharePoint automation support →
OceanCloud specialises in SharePoint consulting, M365 migration, Power Platform solutions, and enterprise governance. Let's discuss how we can help.
Book a Free 60-Minute Consultation ➜