Everything in one place — install PowerShell 7, install the PnP module, register your Entra app, generate a self-signed certificate, upload it, and connect with your method of choice.
Admin & AutomationMay 23, 202615 min read
PnP PowerShell is the most widely used open-source PowerShell module for managing SharePoint Online and Microsoft 365. To use it reliably in automated scripts, scheduled tasks, or Azure DevOps pipelines, you need an Entra app registration (formerly Azure AD app) and a certificate-based connection. This guide walks you through the complete setup from zero — including PowerShell 7 installation, module setup, roles, app registration in the Entra portal, self-signed certificate creation, and all three connection methods.
Go to portal.azure.com > Azure Active Directory > App registrations. Click 'New registration', give it a name (e.g., 'PnP-Script-Admin'), select 'Accounts in this organizational directory only', and click Register. Note the Application ID (client ID) — you'll need this for authentication.
2
Configure API permissions
In your app registration, go to 'API permissions' > 'Add a permission'. Select 'Microsoft Graph' > 'Application permissions'. Search for and add: 'Sites.FullControl.All', 'Files.ReadWrite.All', 'User.Read.All'. Click 'Grant admin consent' so users don't see consent prompts.
3
Create a client secret
Go to 'Certificates & secrets' > 'Client secrets' > 'New client secret'. Set expiry (90 days or 12 months) and click Add. Copy the Value immediately — you won't see it again. Store it securely (never commit to git).
4
Create an Azure Key Vault (optional but recommended)
In Azure Portal, create an Azure Key Vault to store secrets. Add your client secret as a key vault secret. Update your PnP scripts to retrieve secrets from Key Vault instead of hardcoding them.
5
Test authentication in your PnP PowerShell script
Use Connect-PnPOnline -Url [site-url] -ClientId [app-id] -ClientSecret [secret]. Verify connection succeeds. Once working, wrap it in try-catch to handle token expiry and re-authentication gracefully.
PnP PowerShell supports three authentication methods. Choose based on your use case:
Interactive
-Interactive
Opens a browser window for sign-in including MFA. Runs as the signed-in user.
✓ Development and testing
✓ Ad-hoc admin tasks
✗ Cannot be automated (requires human)
✗ Not for scheduled tasks
PFX Certificate
-CertificatePath
Authenticates non-interactively using a .pfx certificate file on disk. App identity, no user.
✓ Scheduled tasks, pipelines
✓ Works without cert store access
✗ PFX file (with private key) must be secured
✗ Password must be handled securely
Thumbprint
-Thumbprint
Authenticates non-interactively using a certificate already installed in the Windows certificate store.
✓ No PFX file on disk
✓ Ideal for on-premises servers
✗ Requires cert installed on each machine
✗ Windows-only
Interactive vs App-only permissions: The -Interactive method uses delegated permissions — the app can only do what the signed-in user can do. The -CertificatePath and -Thumbprint methods use application permissions — the app has its own identity and does not need a user account. For unattended automation, always use certificate-based authentication with application permissions.
Step 1: Install PowerShell 7.4 or Later
PnP.PowerShell is cross-platform and current PnP documentation requires PowerShell 7.4.0 or later. Do not run these examples from Windows PowerShell 5.1; launch pwsh so the current module loads correctly.
Check your current PowerShell version
PowerShell — check version
$PSVersionTable.PSVersion
Install PowerShell 7 via winget (recommended on Windows)
Download the Windows 64-bit MSI from the PowerShell GitHub Releases page. The file is named PowerShell-7.x.x-win-x64.msi. Run the installer with default options.
After installation: PowerShell 7.4+ installs alongside Windows PowerShell 5.1 — it does not replace it. Launch it by running pwsh instead of powershell. In the Windows Start menu it appears as "PowerShell 7".
The module is published to the PowerShell Gallery. Run these commands inside PowerShell 7 (pwsh).
Set the execution policy (if required)
PowerShell 7 — set execution policy
# If scripts are blocked, set the policy for the current user
Set-ExecutionPolicy -ExecutionPolicy RemoteSigned -Scope CurrentUser
Install PnP.PowerShell
PowerShell 7 — install module
# Install for the current user (no administrator rights needed)
Install-Module -Name PnP.PowerShell -Scope CurrentUser

# To install for all users on the machine (requires Run as Administrator)
# Install-Module -Name PnP.PowerShell -Scope AllUsers

Get-Module -Name PnP.PowerShell -ListAvailable
Update an existing installation
PowerShell 7 — update module
Update-Module -Name PnP.PowerShell

Import-Module PnP.PowerShell
Get-Module PnP.PowerShell | Select-Object Version
Module name matters: The current module is PnP.PowerShell (with a dot). An older module called SharePointPnPPowerShellOnline (no dot) exists on the Gallery but is deprecated and no longer maintained. Always use PnP.PowerShell.
Creating an Entra app registration and granting it high-privilege permissions requires specific Microsoft Entra roles. Confirm these with your tenant administrator before starting.
Task
Required role
Notes
Create an app registration
Application Administrator or Cloud Application Administrator
These roles allow creating and managing app registrations without being a Global Admin
Grant admin consent for Graph permissions
Privileged Role Administrator or Global Administrator
Required for high-privilege Application permissions such as Sites.FullControl.All
Run SharePoint tenant-level cmdlets
SharePoint Administrator or Global Administrator
Needed for cmdlets like Get-PnPTenantSite — the Entra app alone is not sufficient
Upload certificate to app
Application Administrator (on that app)
The app owner can upload certs to their own app without Global Admin
Least privilege note: If your scripts only access specific site collections and not the entire tenant, request Sites.Selected (application permission) and use Graph API to grant access to individual sites. This is the most secure option and avoids giving the app full tenant-wide SharePoint access.
Reference map for the full PnP app-registration flow from Entra app creation through connection validation.
🏠›Microsoft Entra ID›App registrations›+ New registration
entra.microsoft.com › Applications › App registrations › New registration
Name — Enter a descriptive name, e.g. PnP SharePoint Automation. This name appears in audit logs.
Supported account types — Select: Accounts in this organizational directory only (Single tenant). Only your organisation's users can use this app.
Redirect URI — Leave blank if you are only using certificate-based (non-interactive) authentication. If you also want -Interactive support, select Public client/native (mobile & desktop) and enter: https://login.microsoftonline.com/common/oauth2/nativeclient
Click: Register
Note your Application IDs
After registration, you land on the app's Overview page. Note down these two values — you will need them for every Connect-PnPOnline call:
Application (client) ID — A GUID like xxxxxxxx-xxxx-xxxx-xxxx-xxxxxxxxxxxx. This is your -ClientId parameter.
Directory (tenant) ID — A GUID that identifies your Entra tenant. This is your -Tenant parameter (you can also use yourcompany.onmicrosoft.com).
Copy both values to a temporary notepad — you will use them in Step 8.
Step 5: Configure API Permissions
For certificate-based (app-only) connections, you need Application permissions — not Delegated permissions. Application permissions give the app its own identity, independent of any user account. The required permissions depend on what your scripts will do.
🔒›Your app›API permissions›+ Add a permission
Recommended permissions for SharePoint management
API
Permission name
Type
When you need it
Microsoft Graph
Sites.FullControl.All
Application
Full read/write access to all SharePoint sites via Graph. Required for most PnP cmdlets in app-only mode.
Microsoft Graph
Sites.ReadWrite.All
Application
Read and write sites — use instead of FullControl if you don't need to manage permissions.
Microsoft Graph
User.ReadBasic.All
Application
Resolve users by email/UPN. Required if scripts look up user profiles.
Microsoft Graph
Group.ReadWrite.All
Application
Manage Microsoft 365 groups (which back Teams and SharePoint team sites).
SharePoint
Sites.FullControl.All
Application
Full control via SharePoint CSOM/REST — required for tenant-level PnP cmdlets like Get-PnPTenantSite.
entra.microsoft.com › API permissions › Add a permission
Click + Add a permission
Select Microsoft Graph → Application permissions → search Sites.FullControl.All → tick the checkbox → click Add permissions
Repeat for any additional Graph permissions your scripts need
Click + Add a permission again → select SharePoint → Application permissions → search Sites.FullControl.All → tick → Add permissions
Click: Grant admin consent for [Your Tenant]
⚠ Admin consent is required for Application permissions. Without it, connections will fail with an authorization error. Only a Privileged Role Administrator or Global Administrator can grant consent.
Principle of least privilege — use Sites.Selected: Instead of Sites.FullControl.All (which grants access to every site in your tenant), you can add Sites.Selected (Application, Microsoft Graph) and then explicitly grant the app permission to only specific sites using Graph API or PnP PowerShell's Grant-PnPAzureADAppSitePermission. This is best practice for production apps.
Step 6: Generate a Self-Signed Certificate
Certificate-based authentication requires a key pair: a public key (uploaded to Entra) and a private key (kept secure on your machine or server). You can generate both with a single PowerShell command. Run these commands in PowerShell 7 on the machine where you will run the scripts.
PowerShell 7 — create self-signed certificate
# ── Step 1: Create the certificate in the Windows cert store ──
# Certificate friendly name shown in Windows certificate store and Entra.
$certName = "PnPSharePointApp"

# Certificate validity period; shorten or extend based on your security policy.
$notAfter  = (Get-Date).AddYears(2)   # 2-year validity
$cert = New-SelfSignedCertificate `
    -Subject           "CN=$certName" `
    -CertStoreLocation "Cert:\CurrentUser\My" `
    -KeyExportPolicy   Exportable `
    -KeySpec           Signature `
    -KeyLength         2048 `
    -KeyAlgorithm      RSA `
    -HashAlgorithm     SHA256 `
    -NotAfter          $notAfter

Write-Host "Thumbprint: $($cert.Thumbprint)" -ForegroundColor Cyan

# Public certificate path to upload into the Entra app registration.
$cerPath = "C:\Certs\PnPSharePointApp.cer"
New-Item -ItemType Directory -Force -Path "C:\Certs" | Out-Null
Export-Certificate -Cert $cert -FilePath $cerPath
Write-Host "Public key exported to: $cerPath"

# Private PFX path used by automation scripts.
$pfxPath     = "C:\Certs\PnPSharePointApp.pfx"

# PFX export password; use a secure secret source for production.
$pfxPassword = ConvertTo-SecureString -String "YourSecureP@ssword!" -AsPlainText -Force
Export-PfxCertificate -Cert $cert -FilePath $pfxPath -Password $pfxPassword
Write-Host "PFX exported to: $pfxPath"
Secure your PFX file: The .pfx file contains the private key and is equivalent to a password. Store it in a dedicated folder accessible only to the service account that runs the scripts. Never commit it to source control, place it on a shared drive, or email it. Consider using Azure Key Vault for production environments.
Alternative: Use PnP's built-in certificate generator
After installing PnP.PowerShell, you can use New-PnPAzureCertificate which generates both the .cer and .pfx in a single command without creating a cert store entry:
# This does NOT require an active PnP connection — run it before connecting
# PFX export password; use a secure secret source for production.
$pfxPassword = ConvertTo-SecureString -String "YourSecureP@ssword!" -AsPlainText -Force

New-PnPAzureCertificate `
    -CommonName         "PnPSharePointApp" `
    -OutPfx             "C:\Certs\PnPSharePointApp.pfx" `
    -OutCert            "C:\Certs\PnPSharePointApp.cer" `
    -CertificatePassword $pfxPassword `
    -ValidYears         2
Step 7: Upload the Certificate to Your Entra App
Upload only the .cer file (public key) to Entra. Never upload the .pfx — Entra only needs the public key to verify signatures made by the private key.
Click the folder icon and browse to C:\Certs\PnPSharePointApp.cer
Optionally add a description, e.g. Script server — expires May 2028 (helps at renewal time)
Click: Add
After upload, the Certificates tab shows the certificate thumbprint, start date, and expiry date. The thumbprint shown here must match the one output by New-SelfSignedCertificate in Step 6.
Certificate flow — what goes where
New-SelfSignedCertificate
Creates key pair in Windows cert store Cert:\CurrentUser\My
→
Export-Certificate (.cer)
Public key only Safe to share
→
⇧ Upload to Entra
Entra stores fingerprint to verify your app's signature
Export-PfxCertificate (.pfx)
Private + public key Password-protected
→
💾 Use with -CertificatePath
PnP reads the PFX and signs auth requests with the private key
→
🔑 Or use -Thumbprint
PnP looks up the cert in the Windows cert store by its thumbprint
Certificate expiry: Self-signed certificates expire. The -NotAfter (Get-Date).AddYears(2) gives you 2 years. Set a calendar reminder 60 days before expiry to generate a new certificate, upload the new .cer to Entra (you can have multiple active certificates at the same time), and update your scripts before removing the old one.
Step 8: Connect with Your Chosen Method
Replace the placeholder values with your actual Application (client) ID and Tenant ID from Step 4.
Method 1 — Interactive (browser sign-in)
Interactive authentication opens a browser window, signs in as a real user, and runs commands under that user's identity. It uses delegated permissions — the app can only access what the signed-in user is already allowed to access in SharePoint. Two variants exist depending on whether you supply -ClientId.
Variant
-ClientId needed?
App registration needed?
Best for
A — Explicit delegated app
Yes
Yes — must have delegated permissions + Redirect URI
Ad-hoc scripts, testing, controlled consent
B — Certificate app
Yes
Yes — must have application permissions + certificate
Automation, scheduled jobs, CI/CD
Variant A — Interactive with explicit ClientId
Use an explicit ClientId for interactive PnP examples. The browser popup still handles sign-in and MFA, but the app registration, delegated permissions, and consent trail are clear and repeatable.
PowerShell 7 — Interactive with ClientId
# Entra app Client ID used by PnP.PowerShell interactive authentication.
    $clientId = "xxxxxxxx-xxxx-xxxx-xxxx-xxxxxxxxxxxx"

Connect-PnPOnline `
    -Url "https://contoso.sharepoint.com" `
    -ClientId $clientId `
    -Interactive

$web = Get-PnPWeb
Write-Host "Connected to: $($web.Title)"
First-run tenant consent: On the very first use of your delegated PnP app in a tenant, Entra may present a consent screen. A Global Administrator may need to approve the requested delegated permissions once.
Variant B — Your own ClientId (delegated permissions)
If you need full control over which permissions the app requests, register your own Entra app and add delegated permissions to it. This is fundamentally different from the certificate-based methods (Methods 2 and 3): delegated permissions act on behalf of the signed-in user, meaning the user's own SharePoint access is the effective ceiling — the app cannot do more than the user can.
Before this variant will work your app registration needs two things in Entra:
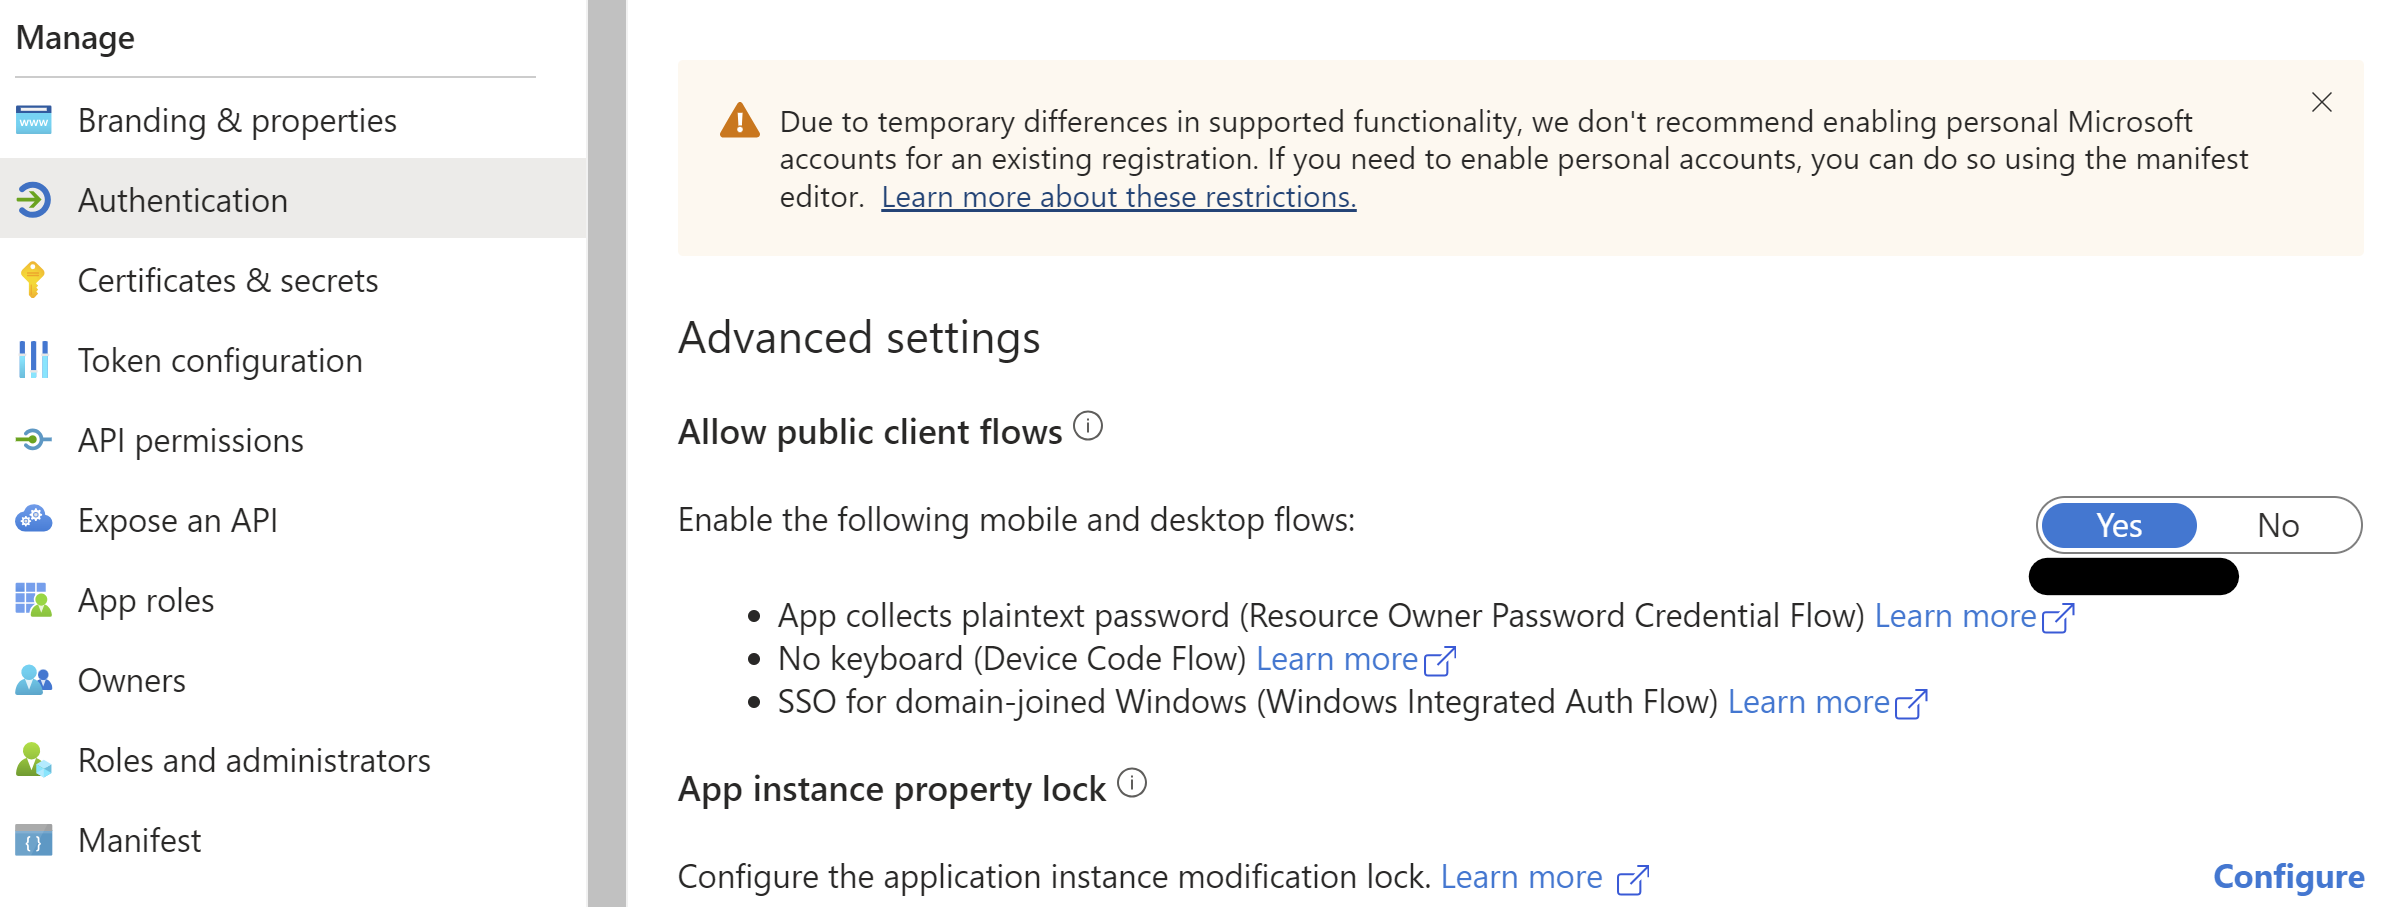
PnP PowerShell authentication screenshot showing the public client setting needed for interactive delegated sign-in. Source: PnP PowerShell documentation.
A Redirect URI: In your app → Authentication → + Add a platform → Mobile and desktop applications → tick https://login.microsoftonline.com/common/oauth2/nativeclient → Configure. Then scroll to Advanced settings and set Allow public client flows to Yes.
Delegated permissions (not Application permissions — those are for cert-based auth only):
API
Delegated permission
When you need it
Microsoft Graph
Sites.ReadWrite.All
Read and write SharePoint sites as the signed-in user
Microsoft Graph
Sites.FullControl.All
Manage permissions — user must already be a site owner or higher
Microsoft Graph
User.ReadBasic.All
Resolve users by name or email in scripts
SharePoint
AllSites.FullControl
SharePoint REST / CSOM tenant admin operations as the signed-in user
🔒›Your app›API permissions›+ Add a permission›Delegated permissions
PowerShell 7 — Interactive with your own app (delegated permissions)
# -ClientId is your own app registration that has:
#   - Redirect URI configured (Public client / native platform)
#   - Delegated permissions (Sites.ReadWrite.All, etc.) — NOT Application permissions
#   - "Allow public client flows" set to Yes in Authentication settings
Connect-PnPOnline `
    -Url      "https://contoso.sharepoint.com" `
    -ClientId "xxxxxxxx-xxxx-xxxx-xxxx-xxxxxxxxxxxx" `
    -Interactive

$web = Get-PnPWeb
Write-Host "Connected to: $($web.Title)"
Delegated vs Application permissions — common mistake: The app registration created in Steps 4–7 of this guide was configured with Application permissions for certificate-based (non-interactive) use. If you pass that same ClientId to -Interactive, the sign-in will fail or return a token without the correct SharePoint scopes. Interactive auth requires Delegated permissions. You can add both permission types to the same app, or keep a separate app registration for interactive vs automated use.
Method 2 — Client ID + Certificate Path (PFX file)
Fully non-interactive. Authenticates as the application, not a user. Suitable for scheduled tasks, Azure Automation runbooks, and CI/CD pipelines.
PowerShell 7 — Connect-PnPOnline with PFX certificate
# Store the password securely — never hardcode in scripts
# In production, retrieve from Azure Key Vault or an environment variable
# PFX password used to unlock the certificate private key.
$pfxPassword = ConvertTo-SecureString `
    -String    "YourSecureP@ssword!" `
    -AsPlainText -Force

Connect-PnPOnline `
    -Url                 "https://contoso.sharepoint.com" `
    -ClientId            "xxxxxxxx-xxxx-xxxx-xxxx-xxxxxxxxxxxx" `
    -CertificatePath     "C:\Certs\PnPSharePointApp.pfx" `
    -CertificatePassword $pfxPassword `
    -Tenant              "contoso.onmicrosoft.com"

$web = Get-PnPWeb
Write-Host "Connected as app to: $($web.Title)"
Method 3 — Client ID + Thumbprint (Windows cert store)
Also non-interactive. The certificate must already be installed in the current user's or local machine's certificate store. No PFX file is needed at runtime — the private key stays in the protected cert store.
PowerShell 7 — Connect-PnPOnline with Thumbprint
# The thumbprint was displayed in Step 6 when you created the certificate
# You can also retrieve it from the Entra portal (Certificates & secrets tab)
# or from PowerShell:
$thumbprint = (Get-ChildItem Cert:\CurrentUser\My |
    Where-Object { $_.Subject -like "*PnPSharePointApp*" }).Thumbprint

Connect-PnPOnline `
    -Url        "https://contoso.sharepoint.com" `
    -ClientId   "xxxxxxxx-xxxx-xxxx-xxxx-xxxxxxxxxxxx" `
    -Thumbprint $thumbprint `
    -Tenant     "contoso.onmicrosoft.com"

$web = Get-PnPWeb
Write-Host "Connected as app to: $($web.Title)"
Thumbprint on server deployments: When deploying to a new server, import the PFX into the Windows certificate store first, then use the thumbprint. Import command: Import-PfxCertificate -FilePath "C:\Certs\PnPSharePointApp.pfx" -CertStoreLocation "Cert:\LocalMachine\My" -Password $pfxPassword. After import, the PFX file is no longer needed and can be deleted.
Step 9: Verify the Connection
Run a few PnP cmdlets to confirm everything is working correctly.
PowerShell 7 — verify PnP connection
# Basic connectivity check
$web = Get-PnPWeb
Write-Host "Site title  : $($web.Title)"
Write-Host "Site URL    : $($web.Url)"
Write-Host "Site template: $($web.WebTemplate)"

# Check connection details (shows which ClientId and auth method is active)
Get-PnPConnection

# List all site collections (requires SharePoint Admin role for the app)
# Use -Limit All to retrieve more than the default 200 results
Get-PnPTenantSite -Limit All | Select-Object Title, Url, Template | Format-Table -AutoSize

# List libraries on the current site
Get-PnPList | Where-Object { $_.BaseType -eq "DocumentLibrary" } | Select-Object Title, DefaultViewUrl
Access denied after connecting? A successful Connect-PnPOnline does not guarantee that the app has permission to the specific site. If you see "Access denied" after connecting, check that: (1) admin consent was granted for the API permissions in Step 5, and (2) if using Sites.Selected, the app has been explicitly granted access to that site using Grant-PnPAzureADAppSitePermission.
Connecting to the SharePoint Admin Center
Some cmdlets (like Get-PnPTenantSite, Set-PnPTenant, New-PnPSite) require connecting to the admin URL, not a regular site URL:
PowerShell 7 — connect to SharePoint admin center
# Admin center URL format: https://[tenant]-admin.sharepoint.com
# PFX password used to unlock the certificate private key.
$pfxPassword = ConvertTo-SecureString -String "YourSecureP@ssword!" -AsPlainText -Force

Connect-PnPOnline `
    -Url                 "https://contoso-admin.sharepoint.com" `
    -ClientId            "xxxxxxxx-xxxx-xxxx-xxxx-xxxxxxxxxxxx" `
    -CertificatePath     "C:\Certs\PnPSharePointApp.pfx" `
    -CertificatePassword $pfxPassword `
    -Tenant              "contoso.onmicrosoft.com"

# Now tenant-level cmdlets are available
Get-PnPTenantSite -Limit All
New-PnPSite -Type TeamSite -Title "Project Alpha" -Alias "project-alpha"
Use a dedicated service account for interactive connections
Never use a named user's account (e.g. [email protected]) for automation. Create a dedicated service account (e.g. [email protected]), assign it the minimum SharePoint Admin role it needs, and assign the PnP app to that account. This decouples the automation from any individual's employment status.
2
Never store PFX files or passwords in source control
Add *.pfx to your .gitignore and treat the PFX like a password. In production, load the password from Azure Key Vault, an environment variable, or a secrets management system — never hardcode it in a script file.
3
Set calendar reminders for certificate renewal
Create a 2-year certificate and set a reminder 60 days before expiry. Generate a new certificate, upload the new .cer to Entra (you can have multiple active certs simultaneously), update your scripts or vault with the new thumbprint/PFX, confirm the new cert works, then delete the old one from Entra. Never let the certificate expire — it causes silent auth failures in scheduled scripts.
4
Prefer Sites.Selected over Sites.FullControl.All in production
Granting Sites.FullControl.All means the app can access every site in your tenant. For production apps that only need to access specific sites, use Sites.Selected and grant granular access per site. This limits the blast radius if the app's credentials are compromised.
5
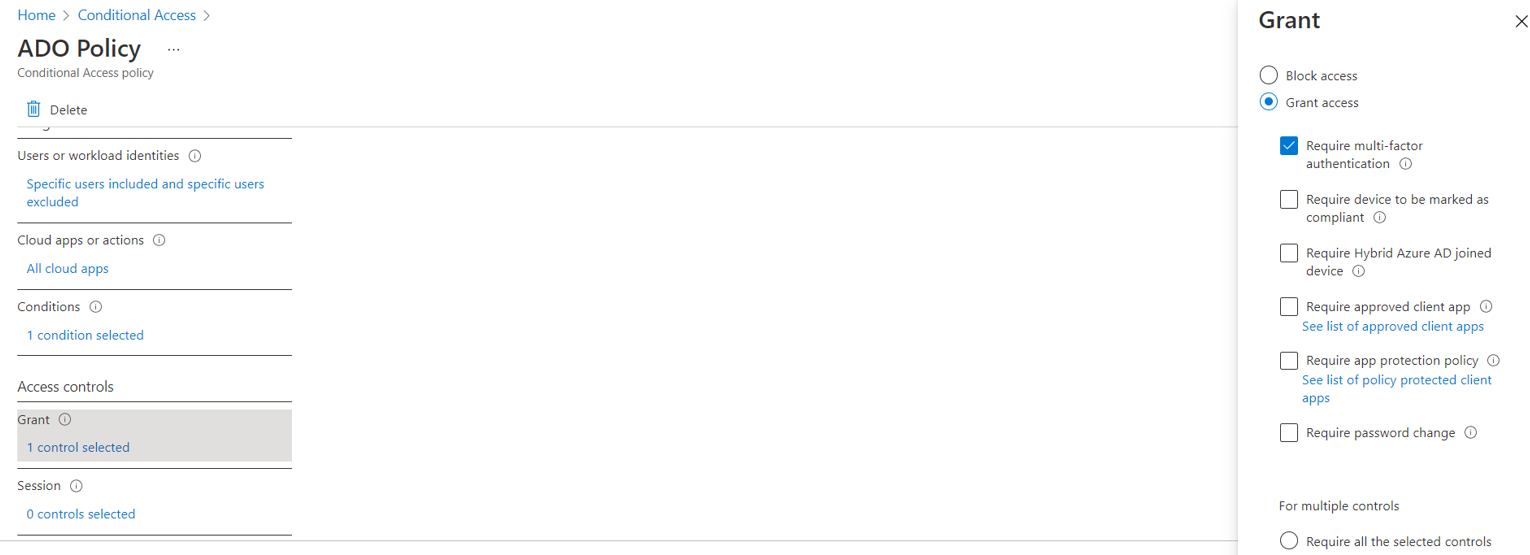
Enable conditional access for your app
In the Entra admin center, apply conditional access policies to restrict which IP addresses or named locations can authenticate as your PnP app. This prevents use of the certificate from outside your corporate network even if the PFX is stolen.
Troubleshooting Common Errors
AADSTS70011: The provided request must include a 'response_type' input parameterCause: Wrong redirect URI or the app is not configured for the requested auth flow. Fix: For interactive auth, ensure the Redirect URI is set to https://login.microsoftonline.com/common/oauth2/nativeclient under Public client platform in Entra › Authentication.
AADSTS700027: Client assertion contains an invalid signatureCause: The certificate in the app registration does not match the PFX or thumbprint being used. Fix: Verify that the thumbprint shown in Entra (Certificates & secrets tab) exactly matches $cert.Thumbprint from PowerShell. If you recreated the cert, re-upload the new .cer to Entra.
Invoke-WebRequest: The remote name could not be resolved: 'login.microsoftonline.com'Cause: No internet connectivity or DNS resolution failure on the server. Fix: Confirm the server can reach login.microsoftonline.com and graph.microsoft.com. Check proxy settings — PnP respects the $env:HTTPS_PROXY environment variable.
Access denied. You do not have permission to perform this action or access this resource.Cause: Connection succeeded but the app lacks permission on that site. Fix: (1) Confirm admin consent was granted in Entra for the required permissions. (2) If using Sites.Selected, run Grant-PnPAzureADAppSitePermission to explicitly add the app to the site. (3) Check if the site has unique permissions that exclude the app's identity.
The term 'Connect-PnPOnline' is not recognized as the name of a cmdletCause: PnP.PowerShell is not installed in the current PowerShell session or version. Fix: Run Get-Module PnP.PowerShell -ListAvailable to check. If not found, run Install-Module PnP.PowerShell -Scope CurrentUser. Ensure you are running PowerShell 7.4 or later (pwsh), not Windows PowerShell 5.1 (powershell).
Cannot find certificate with thumbprint 'ABC123...' in certificate storeCause: The -Thumbprint method cannot find the cert in the store. Fix: Run Get-ChildItem Cert:\CurrentUser\My to list available certs. If the cert is missing, import the PFX: Import-PfxCertificate -FilePath "path.pfx" -CertStoreLocation "Cert:\CurrentUser\My" -Password $pfxPassword. On a server, use Cert:\LocalMachine\My instead.
Need help setting up PnP PowerShell automation for your tenant?
OceanCloud builds and maintains SharePoint automation scripts for organisations of all sizes — from simple scheduled reports to complex multi-tenant governance pipelines. We handle the Entra app setup, certificate management, and Power Automate integration so your team doesn't have to.
PnP PowerShell is the community-maintained PowerShell module for SharePoint and Microsoft 365 administration.
App registration (client credentials with a certificate) allows PnP to authenticate as an application rather than as an interactive user — essential for scheduled scripts, automation pipelines, and CI/CD workflows that cannot prompt for a password.
For SharePoint-only operations: Sites.FullControl.All (application permission). For tenant-level operations (creating site collections, managing users): SharePoint > Have full control of all site collections.
For Exchange Online operations: Exchange.ManageAsApp plus appropriate Exchange role assignment. Always follow least privilege — grant only what the script actually uses.
Client secrets expire (maximum 2 years) and must be manually rotated.
Certificates can have longer validity periods and are bound to the device or key vault where they're stored, making them harder to exfiltrate. For production automation, certificates stored in Azure Key Vault or the Windows Certificate Store are significantly more secure than secrets stored in environment variables.
In CI/CD pipelines, store the certificate and password as secrets and load them at runtime.
The Application Administrator role is sufficient for registering apps and granting non-admin API permissions.
To grant application permissions that require admin consent (such as Sites.FullControl.All), you need the Global Administrator or Cloud Application Administrator role to click 'Grant admin consent' in the Entra portal.